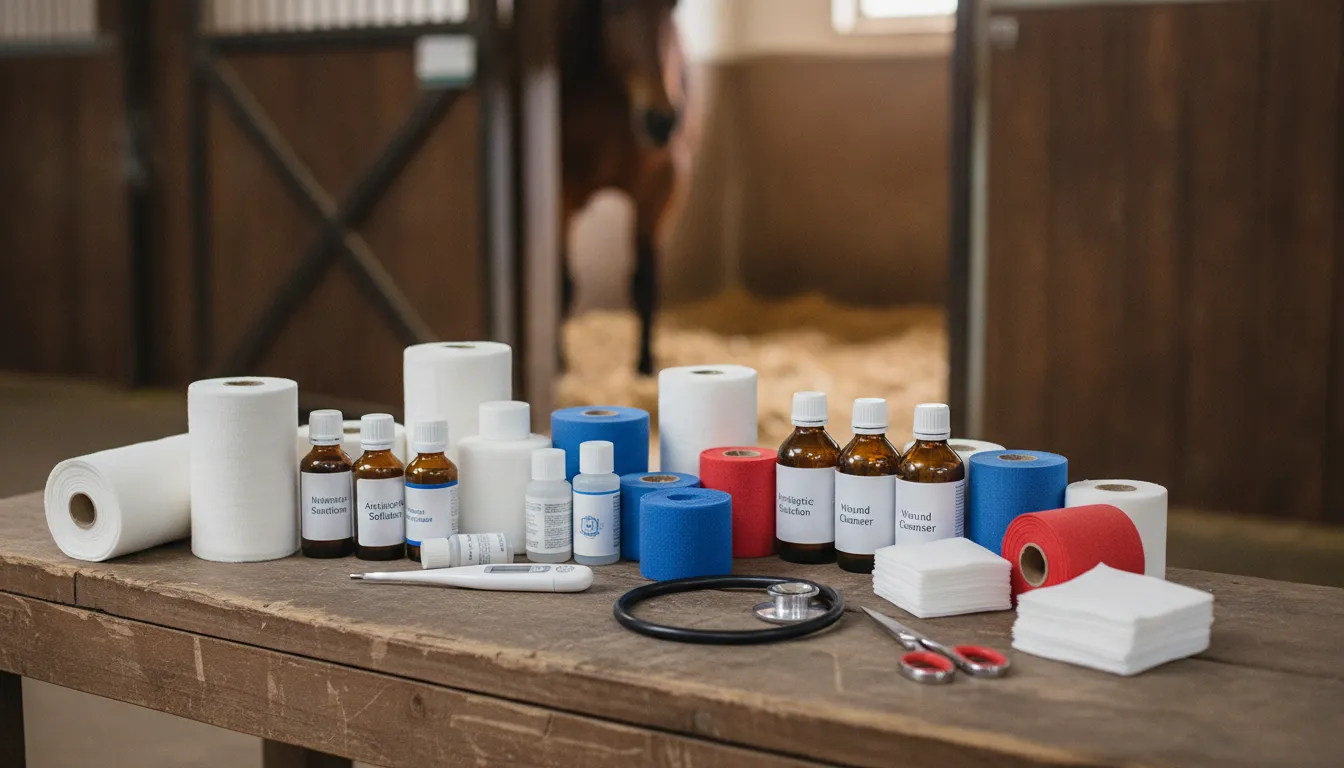

A horse first aid kit is a vital set of supplies for managing injuries until a veterinarian can take over. This kit should include items for wound care like non-stick pads and self-adhesive bandages to stop bleeding and keep dirt out of cuts. According to PetMD, you need tools like a digital thermometer and a stethoscope to measure vitals like heart rate and gut sounds. Antiseptics and saline solution are vital for cleaning skin tears and flushing debris from eyes without causing further pain. Keeping these supplies in a clean and dry container ensures you are ready for sudden accidents or illnesses in the barn. Having the right tools on hand helps you stay calm and provide the best care for your horse during a stressful time.
Essential Wound Care and Bandaging Supplies for Your Horse First Aid Kit
Wound care is the most common task you will face as a horse owner. From small scrapes to deep cuts, your horse first aid kit needs to be ready for anything. A well-stocked kit lets you act fast during a crisis to stop blood and keep out germs. The most vital part of wound care is the three-layer wrapping system. This system keeps the wound clean, dry, and safe from more harm.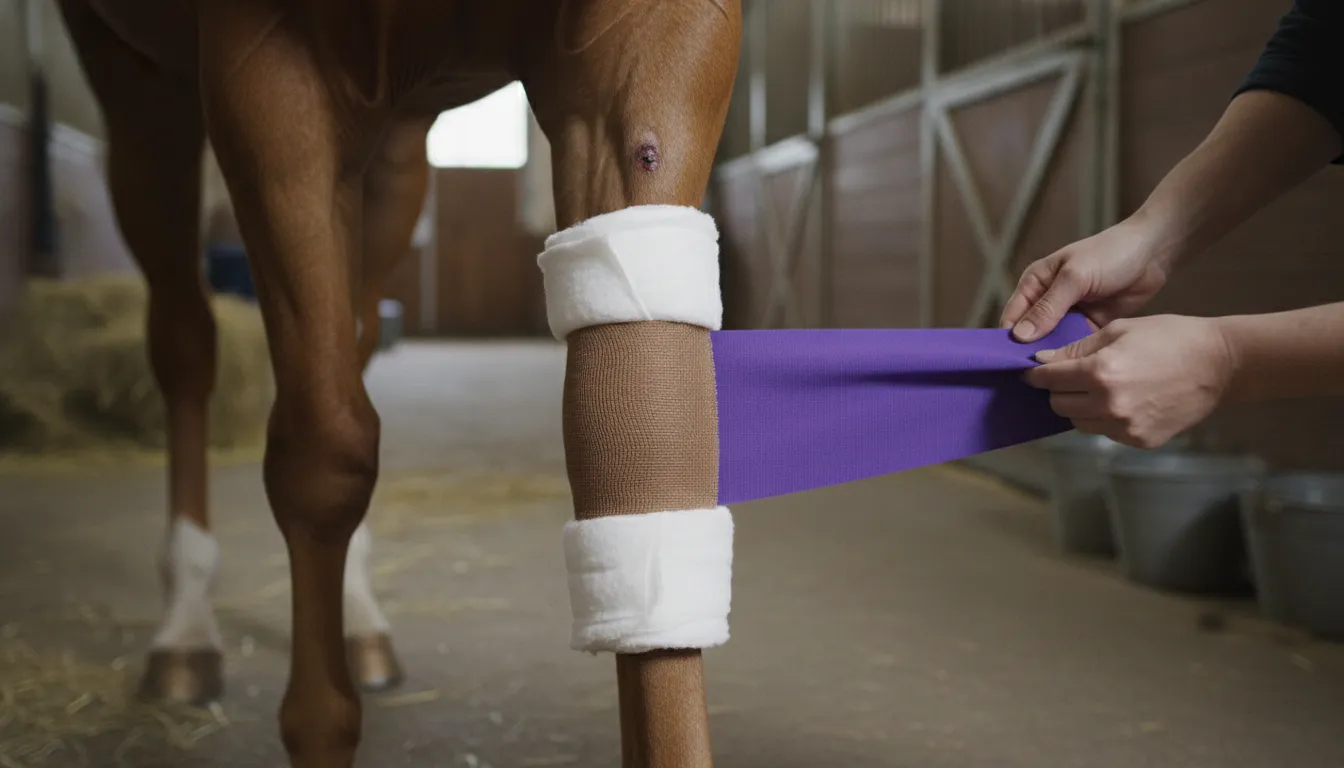
Primary Padding and Contact Layers
The first layer touches the wound. You must use a clean, non-stick pad like a Telfa pad. These pads are a top choice for covering wounds because they do not stick to new skin. Using the wrong material can cause pain and damage the wound when you remove the wrap. You can find these items in our equine wound care collection to make sure your kit is top grade. Next comes the padding layer. It absorbs fluid and cushions the area. Combine rolls or cast padding are perfect for this part. They provide thick, soft protection that spreads the pressure of the wrap evenly. For large wounds on the body, diapers are an excellent choice for padding. They conform to odd shapes and hold significant moisture. This middle layer is vital for keeping the wrap firm but safe.The Outer Bandage Layer
The final layer of the three-part system is the outer wrap. This layer provides the tension needed to keep the padding in place. Follow these steps for a secure leg bandage:- Start with brown gauze (Kling) wrapped evenly over the soft padding from top to bottom. Overlap each pass by half the gauze width to keep the middle layer smooth and prevent bunching that causes pressure sores.
- Apply a layer of self-adhesive VetWrap over the gauze, starting at the top and working downward. Overlap each pass by half the wrap width for even tension and full coverage.
- Secure the top and bottom edges with white tape to prevent the wrap from slipping or catching on stall surfaces. Wrap the tape snugly but not tight enough to restrict blood flow.
- Seal the bottom edge around the hoof with duct tape to block dirt, bedding, and moisture from entering the bandage. This is critical if the horse is turned out in a paddock or stall.
Tapes and Sealing Tools
Tapes play a key role in finishing a wrap correctly. Always keep a roll of white tape in your kit. White tape is very strong and works well for holding a splint or securing loose edges. It helps keep the gauze edges from coming loose during the day. Duct tape is another essential tool for horse owners. It is perfect for sealing the bottom of a leg bandage. A few strips of duct tape around the hoof will keep out dirt and water. This is critical if your horse is turned out in a damp field or a dusty stall. Having these tapes ready ensures your bandages stay in place until the vet arrives.A proper three-layer wrapping system is the foundation of equine wound care. Start with a non-stick pad against the wound, add cotton or combine roll padding for absorption and cushioning, then secure with brown gauze followed by self-adhesive VetWrap. Finish with white tape or duct tape at the top and bottom edges to seal out dirt and moisture. This system protects the injury, reduces contamination risk, and keeps the bandage secure during movement.
What Antiseptics and Wound Cleaners Should Your Equine Kit Contain?
Horses kept in barns or pastures inevitably acquire small cuts and scrapes. You need the right supplies to clean these wounds promptly and prevent infection. The Colorado State University Veterinary Teaching Hospital recommends keeping a set of proven cleaning agents in your barn.
Chlorhexidine and Betadine Dilution
Chlorhexidine solution is the preferred antiseptic for equine wound cleaning. It kills a broad spectrum of bacteria and remains active longer than many alternatives. Dilute it to a 0.05 percent solution for safe use on open wounds. Betadine (povidone-iodine) is another effective option. It provides rapid antimicrobial action but can irritate tissue if used undiluted. Mix Betadine to a 1 percent solution the color of weak tea. Never pour full-strength Betadine or chlorhexidine into a fresh wound. Having both options in your horse first aid kit gives you flexibility depending on the injury type and your vet's recommendation.Saline for Flushing and Eyes
Sterile saline solution is a cornerstone of any emergency kit. Use it to flush debris from wounds, irrigate deep punctures, and rinse eyes that are irritated or have foreign material. Saline is gentle enough for sensitive tissues yet effective at removing dirt, bedding, and other contaminants. Keep several bottles or saline冲洗 squeeze bottles in your kit. You can also use an eye wash bottle with a curved nozzle for precise flushing of the eye surface. Check expiration dates regularly because saline has a limited shelf life once opened.Ointments and Sprays for Healing
Antibiotic ointments such as triple antibiotic or silver sulfadiazine (SSD) help prevent infection in fresh wounds. Apply a thin layer after cleaning and before bandaging. Wound sprays containing antimicrobial agents offer a convenient no-touch application for hard-to-reach areas. Aloe vera-based gels soothe minor surface irritations and burns. Petroleum jelly protects sensitive skin around wounds from moisture and manure. Stock these items from our horse first aid supplies collection to keep your medicine cabinet complete.Effective wound cleaning starts with the right antiseptics. Chlorhexidine diluted to 0.05 percent and Betadine diluted to 1 percent (tea-color strength) are the gold standards for equine wound disinfection. Sterile saline flushes debris from cuts and eyes. Antibiotic ointments and wound sprays provide ongoing protection after cleaning. Never apply full-strength antiseptics to open wounds as they can damage healthy tissue.
Which Diagnostic Tools Do You Need for Your Horse?
Before you treat any injury, you must assess the horse's overall condition. A few diagnostic tools in your horse first aid kit let you measure vital signs that guide your decision to treat at home or call the vet.Monitoring Core Body Temperature
A digital thermometer is one of the most important items in your barn. Normal equine temperature ranges from 99 to 101 degrees Fahrenheit. Any reading above 102 degrees indicates fever or heat stress. Below 98 degrees may signal shock or hypothermia. Use a digital rectal thermometer with a length of string and clip attached so it cannot be drawn completely into the rectum. Lubricate the tip before use and hold it in place for at least 60 seconds until it beeps. Record the temperature so you can track changes over time.Checking Heart and Respiratory Rates
A stethoscope helps you assess heart rate, rhythm, and lung sounds. A healthy adult horse at rest has a heart rate of 28 to 44 beats per minute. A rate above 60 beats per minute at rest is a serious concern. Use the stethoscope behind the elbow on the left side to hear the heartbeat most clearly. Respiratory rate is 8 to 16 breaths per minute at rest. Watch the flank or hold your hand near the nostrils to count breaths. Elevated respiratory rates can indicate pain, fever, or respiratory distress. A stethoscope from our equine monitoring tools range helps you detect abnormalities early.Assessing Gut Sounds and Mucous Membranes
Gut sounds tell you whether your horse's digestive system is functioning normally. Place the stethoscope on the flank area behind the last rib on both sides. Healthy horses produce consistent gurgling and tinkling sounds every few seconds. Absent or very loud, painful-sounding gut sounds are red flags that require veterinary attention. Mucous membrane color also provides critical information. Lift the upper lip and check the gum color. Pink and moist is normal. Brick red or purple gums indicate toxicity or shock. Pale or white gums suggest blood loss. Capillary refill time should be under two seconds. Press the gum with your thumb and count how long the white spot takes to return to pink.A digital thermometer, stethoscope, and your own observational skills form the diagnostic core of any barn emergency kit. Normal equine vitals include a temperature of 99 to 101 degrees Fahrenheit. Heart rate of 28 to 44 beats per minute, and respiratory rate of 8 to 16 breaths per minute at rest. Pale or purple gums, absent gut sounds, and a heart rate above 60 at rest all warrant immediate veterinary assessment.
What Medications Should You Keep in Your Equine First Aid Kit?
Your horse first aid kit should contain a limited set of medications approved by your veterinarian. Stocking the wrong drugs or incorrect dosages can do more harm than good.Managing Pain and Swelling
Phenylbutazone (bute) is the most common equine anti-inflammatory. It comes as a paste or powder and reduces fever, pain, and swelling. The typical dose is 1 to 2 grams per 1,000 pounds of body weight once or twice daily. Flunixin meglumine (Banamine) is another NSAID often used for colic pain and muscle injuries. It is available as an injectable or paste. Your veterinarian should determine which NSAID and protocol fits your horse's needs and medical history.Sedation and Infection Control
Do not keep prescription sedatives or antibiotics in your kit without explicit veterinary authorization. Improper antibiotic use contributes to resistance and may mask a worsening infection. If your vet has prescribed a specific sedative for emergencies such as loading an injured horse onto a trailer, include it with clear dosing instructions. Oral electrolytes can be useful for rehydration after heavy exercise or mild diarrhea.The Importance of Professional Advice
Always consult your veterinarian before administering any medication. What worked for a previous horse may be wrong for a different animal due to age, weight, kidney function, or drug interactions. Your vet can provide written protocols for common emergencies. Keep these instructions inside your kit lid alongside a list of emergency contact numbers.Only keep medications in your equine first aid kit that your veterinarian has specifically prescribed for your horse. Phenylbutazone and flunixin meglumine are common NSAIDs for pain and inflammation, but proper dosing depends on the horse's weight and medical history. Never stock prescription antibiotics or sedatives without veterinary guidance. Post written emergency protocols and vet contact information inside your kit lid.
When to Call the Veterinarian vs Treat at Home
Knowing when to treat an injury yourself and when to call the vet is one of the most important equine first aid skills. Your horse first aid kit equips you to handle minor issues, but some situations require professional intervention.Minor Issues You Can Handle
You can safely treat superficial scrapes, small abrasions, and minor skin irritations at home. Clean these wounds with diluted chlorhexidine or saline, apply a thin layer of antibiotic ointment, and bandage if necessary. Punctures of the sole with no significant lameness can be soaked and poulticed. Mild eye irritation from dust or bedding often resolves with saline flushing. Always monitor these conditions for worsening.Critical Signs of an Urgent Issue
Call your veterinarian immediately if your horse shows any of these signs. Use this guide to decide:| Situation | Treat at Home | Call the Vet |
|---|---|---|
| Bleeding | Minor scrape, stops with pressure. | Profuse bleeding, does not slow after 10 minutes of direct pressure. |
| Wounds | Superficial scrapes, small abrasions. | Deep wounds involving joints, tendons, or body cavities. |
| Temperature | 99-101 degrees Fahrenheit. | Above 103 degrees Fahrenheit. |
| Heart rate | 28-44 beats per minute at rest. | Above 60 beats per minute at rest. |
| Gums | Pink and moist. | Pale, purple, brick red, or toxic mucous membranes. |
| Gut sounds | Consistent gurgling every few seconds. | Absent gut sounds or very loud painful sounds. |
| Lameness | Mild (1-2 out of 5). | Severe (4-5 out of 5), unable to bear weight. |
| Eye issues | Mild dust irritation, clears with saline flush. | Eye injuries, sudden vision changes, or corneal ulcers. |
| Colic signs | Mild and resolves quickly. | Rolling, pawing, looking at flank, not passing manure. |
| Fractures | Not applicable. | Suspected fracture or neurological signs. |
Treat superficial scrapes, small abrasions, and mild eye irritation at home with proper cleaning and bandaging. Call your vet immediately for profuse bleeding, deep joint or tendon wounds, colic symptoms, fever above 103 degrees. Heart rate above 60 at rest, pale gums, absent gut sounds, severe lameness, suspected fractures, or neurological signs. When in doubt, always call your veterinarian for guidance.
Hoof Emergencies and Abscess Care: What to Keep in Your Kit
Hoof problems are among the most common equine emergencies. A horse with a hoof abscess experiences intense pain and may refuse to bear weight on the affected limb. Your horse first aid kit should include tools specifically for hoof care.How to Find a Hoof Abscess
A hoof abscess typically causes sudden onset, severe lameness. The horse may hold the affected foot off the ground or point the toe. Use a hoof pick to thoroughly clean the sole and frog. Look for dark spots, soft areas, or discharge near the white line. A hoof tester is the most reliable tool for locating the exact pressure point. Gently squeeze the tester across the sole and heel area. The horse will flinch sharply when you find the abscess site.Tools for Hoof Care
Keep a quality hoof pick in your kit. Also include a hoof knife and a small wire brush for cleaning the sole. A poultice dressing such as Animalintex or an ichthammol draw helps pull an abscess to the surface. Wrap the poultice with a diaper and duct tape boot to hold it in place and protect the hoof from contamination. Wear disposable gloves when working with poultices because the substances stain and can be messy.Thrown Shoes and Stone Bruises
A thrown shoe does not always constitute an emergency, but you should protect the exposed hoof wall. Use duct tape to create a temporary boot that keeps the hoof clean until the farrier arrives. Stone bruises appear as tender spots on the sole, typically after riding on hard or rocky ground. Rest the horse on soft footing and use a padded wrap for comfort. If lameness persists beyond 48 hours, consult your veterinarian.Hoof emergencies require specific tools: a hoof pick, hoof knife, hoof testers, poultice dressing, and duct tape for temporary boot construction. A sudden onset of severe lameness with no visible injury often indicates a hoof abscess. Clean the sole thoroughly and use hoof testers to locate the source. Apply a poultice covered with a diaper and duct tape boot to draw the abscess and protect the hoof.
How to Store and Maintain Your Barn Emergency Kit
Having the right supplies is only half the battle. Your horse first aid kit must be organized, accessible, and maintained so items are ready when you need them.Keep a Kit in Your Trailer
Emergencies do not only happen at home. Keep a second, smaller kit in your horse trailer for shows, trail rides, and competitions. Include a travel-size supply of basic wound care items, a thermometer, saline, antiseptic, and a hoof pick. A compact tackle box or tool bag works well as a trailer kit.Check Your Supplies Often
Set a reminder to inspect your kit every three months. Check expiration dates on medications, saline bottles, and ointments. Replace any opened saline bottles because they lose sterility after 30 days. Restock used items immediately so you are never caught without a critical supply. Rotate wound dressings and bandages that may have become dusty or degraded.Share the Kit Spot
Tell everyone in your household and barn staff where the kit is stored, what it contains, and who to contact in an emergency. Post a laminated list of emergency numbers inside the kit lid, including your veterinarian's primary and after-hours numbers. The nearest equine hospital address, and contact information for a friend with a trailer.Store your main horse first aid kit in a clean, dry, accessible location in the barn. Keep a smaller travel kit in your trailer. Inspect supplies every three months and replace expired or used items immediately. Post emergency contact numbers inside the lid and ensure all barn staff know where the kit lives and how to use its contents.
Frequently Asked Questions
Can I use human first aid supplies on my horse?
Many human first aid supplies are safe for equine use including non-stick pads, roll gauze, stretch bandages, saline solution, and digital thermometers. However, human medications such as ibuprofen and acetaminophen are toxic to horses and should never be used. Stick to equine-specific or vet-recommended medications. Always consult your veterinarian before using any product on your horse for the first time.
How often should I check my horse first aid kit?
Inspect your kit every three months. Check expiration dates on medications, saline, and ointments. Replace any items you have used so the kit stays fully stocked. Saline bottles should be replaced within 30 days of opening. Rotate bandaging materials that may accumulate dust or lose adhesion over time. A quarterly inspection routine ensures your kit is ready when you need it.
Does my horse need a second travel first aid kit?
Yes, keeping a separate travel kit in your horse trailer is highly recommended. Emergencies happen at shows, trail rides, competitions, and during transport. A compact travel kit should include basic wound care supplies, a thermometer, saline solution, antiseptic, a hoof pick, and emergency contact information. A small tackle box or tool bag works well for this purpose.
What is the best way to store horse first aid supplies?
Store your horse first aid kit in a clean, dry, and easily accessible location in the barn. Use a waterproof plastic container or a durable tool box with a secure latch. Keep it off the floor to avoid moisture, dust, and pests. Organize supplies by category using small pouches or dividers. Label everything clearly and post a list of contents on the inside of the lid for quick reference during an emergency.
What should I do if my horse's wound will not stop bleeding?
Apply direct pressure to the wound using a clean non-stick pad or sterile gauze. Hold firm pressure for a full 10 minutes without lifting the pad to check. If blood soaks through, add more padding on top rather than removing the original layer. If bleeding does not slow after 10 minutes of continuous pressure, call your veterinarian immediately. For arterial bleeds where blood is pulsing or spraying, apply pressure and transport the horse to an equine hospital without delay.
Ready to Build Your Complete Barn Emergency Kit?
A well-stocked horse first aid kit gives you the confidence to handle minor injuries while knowing exactly when to call for professional help. Every moment matters when your horse is in distress, and having the right supplies organized and ready can make the difference between a smooth recovery and a crisis.