


A quarter of an inch. That tiny measurement can be the difference between a willing partner and a resistant one. So many behavioral issues and training roadblocks stem from a simple, often overlooked problem: an improperly sized bit. This isn't about bad horsemanship; it's a common knowledge gap. Getting the size right is crucial for your horse's comfort and clear communication. This guide provides the definitive process for how to measure a horse for a bit, ensuring every ride is built on a foundation of trust and wellbeing.
This expert-backed guide walks you through how to measure for a bit, using proven techniques and modern tools to avoid common mistakes. You will discover the importance of correct sizing, learn step-by-step methods, and get tips for interpreting results and choosing the perfect bit.
Take control of your horse’s happiness and your own confidence in the saddle by following each stage for the best results.
Does Your Horse's Bit *Really* Fit?
Ensuring a proper bit fit is fundamental to your horse’s comfort, performance, and long-term wellbeing. As you learn how to measure for a bit, consider that the consequences of an ill-fitting bit can be both immediate and lasting. Horses may show discomfort through head tossing, resistance, or even behavioral issues during training.
A poorly fitted bit not only causes pain and mouth sores but can also lead to long-term dental complications. When owners overlook how to measure for a bit, they risk contributing to their horse’s reluctance to accept the bridle, difficulty in communication, and even chronic injuries to the sensitive tissues inside the mouth. These issues can escalate to behavioral problems, making riding less enjoyable and potentially unsafe.
Modern advancements in 2025 have introduced innovative materials and ergonomic designs, raising the bar for accurate measurement. Precision is now more critical than ever, as today’s bits are crafted to suit the unique anatomy of each horse. Recent studies have shown that up to 70% of bit-related problems originate from improper sizing. For example, research reported that over half of eventing horses examined had oral lesions attributed to bit fit issues, highlighting the real risks involved. You can read more about these findings in the Study: Bit-Related Lesions Found in 52% of Eventing Horses.
| Issue | Percentage of Horses Affected |
|---|---|
| Oral lesions | 52% |
| Improperly fitted bits | 25.8% |
| Behavioral problems | 70% (linked to sizing) |
A real-world example demonstrates how switching to a properly measured bit resolved persistent head tossing and resistance in a competition horse. Once the owner learned how to measure for a bit using updated techniques, the horse’s responsiveness and comfort improved dramatically.
Regulatory trends in the equestrian world are also driving change. Many organizations now require bit checks at competitions, making it essential for riders to understand how to measure for a bit accurately. This shift reflects growing awareness among trainers and veterinarians, who consistently emphasize that correct bit fit is foundational for successful training and the horse’s welfare.
In 2025, taking the time to master how to measure for a bit is not just a technical step—it is a commitment to your horse’s health and your own riding success.

A Rider's Guide to Bit Types and Sizing
Choosing the right bit type and understanding sizing standards is a crucial foundation for anyone learning how to measure for a bit. The variety of bits available in 2025 can be overwhelming, but knowing the basics helps ensure your horse’s comfort and performance.
How Different Bit Types Affect Fit and Function
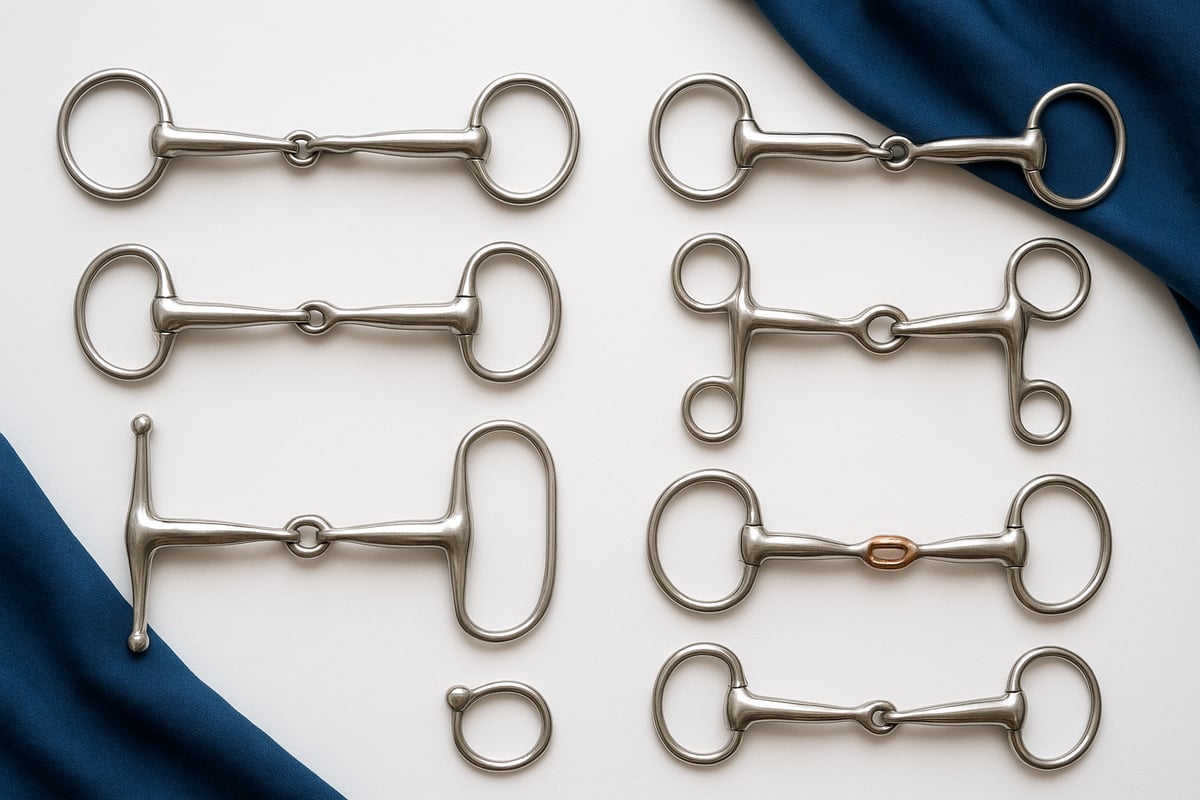
There are several main categories of bits, each designed for specific uses and horse needs. Snaffle bits are popular for direct rein aids and are generally considered gentler. Curb bits introduce leverage, offering more control for advanced riders or specific disciplines. Pelham and gag bits combine features, creating unique pressure points and actions.
Specialty bits, such as those used for correction or specific training, may require unique fitting considerations. Each bit type interacts differently with the horse’s mouth, which directly impacts how to measure for a bit accurately.
For a deeper dive into these categories and their functions, you can consult the Guide to Horse Bits and Types, which provides visuals and detailed descriptions to support your understanding.
The Relationship Between Bit Thickness and Pressure
A common rule of thumb is that a thicker mouthpiece is gentler because it distributes pressure over a wider surface area of the horse's tongue and bars. In contrast, a thinner bit concentrates that same pressure onto a smaller area, making it feel more severe. However, this principle only holds true if your horse has enough room in their mouth to comfortably accommodate the bit. For horses with a low palate, a thick tongue, or a smaller mouth, a bulky bit can be incredibly uncomfortable. It can create constant, unwanted pressure and even make it difficult for them to close their mouth or swallow properly. Ultimately, comfort is the most important factor for clear communication. The right bit thickness depends entirely on your horse's unique anatomy, which is why careful observation is just as crucial as measurement when selecting the perfect piece of horse tack.
Making Sense of Sizing: English vs. Western and More
Sizing standards vary between English and Western disciplines. English bits are typically measured in inches, while Western bits may use either inches or manufacturer-specific sizing charts. Additionally, some brands provide measurements in millimeters or centimeters.
It is important to check the manufacturer’s chart before purchasing, as a 5-inch English snaffle may not fit the same as a 5-inch Western curb. Knowing how to measure for a bit correctly means understanding these differences and translating your measurements to the appropriate standard.
Most adult horses require bits that range from 4.5 to 5.5 inches in width, but breed, mouth conformation, and discipline can all influence the final choice. Always double-check the sizing guide provided by the bit manufacturer.
Common Bit Sizes from Ponies to Drafts
While every horse’s mouth is unique, understanding the typical size ranges gives you a solid starting point. A tiny pony and a towering draft horse have vastly different needs, and their bits reflect that. Pony bits can be as small as three inches, while most standard-sized horses fall comfortably into the 5-inch to 5.5-inch range. For larger breeds like draft horses, you might be looking at bits as wide as seven inches. Here's a key tip: if your measurement lands between two sizes, it's always safer to choose the slightly larger one to avoid pinching or rubbing. This simple guideline can make a huge difference in your horse's comfort and willingness to accept the bit. Having these benchmarks in mind will help you confidently browse different types of horse tack and find the perfect fit.
How Materials and Cheekpieces Influence the Fit
Bit material can affect both comfort and fit. Stainless steel is durable and easy to clean, while copper and synthetic bits may encourage salivation and softness. Material choice should complement your measurement process when determining how to measure for a bit.
Mouthpiece shape is another key factor:
- Single jointed: Offers a nutcracker effect, suitable for most horses.
- Double jointed: Distributes pressure more evenly, ideal for sensitive mouths.
- Mullen/ported: Provides tongue relief, often preferred for horses with low palates.
Cheekpiece styles such as loose ring, eggbutt, and D-ring alter how the bit sits and moves in the mouth. For example, a 5-inch loose ring snaffle may fit more loosely than a 5-inch D-ring, which has fixed sides and less movement.
Quick Comparison: Finding the Right Bit Type
| Bit Type | Typical Sizing | Cheekpiece Effect | Common Use |
|---|---|---|---|
| Snaffle | 4.5-5.5" | Loose/Fixed | General, Training |
| Curb | 4.5-5.5" | Shank | Western, Advanced |
| Pelham | 4.5-5.5" | Combination | Versatile, Shows |
| Gag | 4.5-5.5" | Sliding | Jumping, Control |
Case Study: Loose Ring vs. D-Ring Snaffle Fit
A 5-inch loose ring snaffle allows more lateral movement, which can be beneficial for flexible communication but may pinch if not measured correctly. In contrast, a 5-inch D-ring sits more firmly against the cheeks, reducing movement and risk of pinching. This simple example highlights why understanding both bit type and sizing standard is essential when learning how to measure for a bit.
Research shows that breed, training level, and mouth conformation all influence the ideal bit size. As a rule of thumb, measure carefully and always consider the unique needs of your horse before making a selection.
Special Considerations for Double Bridles
Using a double bridle, which combines a bridoon (a small snaffle) and a curb bit (a Weymouth), adds another layer of complexity to fitting. The primary challenge is finding enough room in your horse's mouth for two separate bits without causing crowding or discomfort. Because of this, precision is non-negotiable. The thickness of each bit becomes incredibly important; for horses with smaller mouths, the combined thickness should be carefully considered to prevent pinching. A good guideline is to ensure neither bit is thicker than 16 mm, as this can quickly overwhelm the available space and create pressure points.
Proper placement is just as critical as size. The bridoon bit should sit first, fitting like a standard snaffle, creating about a half to one full wrinkle at the corner of the horse's mouth. The curb bit then rests slightly lower, in the space where a single bit would normally be. It’s not just about the bits, though. The design of the entire bridle, especially the noseband, plays a role in overall comfort and stability. When you're ready to select the right components, exploring a quality horse tack collection can help you find pieces designed for an ergonomic and comfortable fit.
Getting Ready: Tools and Prep for an Accurate Measurement
Accurate preparation is the cornerstone of how to measure for a bit, ensuring your horse’s comfort and safety. Before starting, gather the right equipment and create the optimal setting. This approach will help you achieve precise results and avoid common measurement mistakes.
What You'll Need to Measure for a Bit
To begin, select the right tool for how to measure for a bit. The most common options include:
- Bit sizer: A commercial plastic or metal tool that quickly gauges mouth width.
- Flexible measuring tape: Non-stretch, fabric or vinyl tape, ideal for precise readings.
- String method: A simple string and marker, useful if you lack specialized tools.
Each tool has its pros and cons. Bit sizers are fast and easy, but sometimes lack accuracy for horses with unique mouth shapes. Measuring tape offers precision, while the string method is budget-friendly and effective in a pinch.
Consider the material of your measuring tool. Ensure it is smooth and sanitized to prevent irritation. If you are unsure about anatomical differences, referencing studies like Oral Dimensions Related to Bit Size in Adult Horses and Ponies can help you understand why accuracy is critical for each horse.
Household Items for Measuring Mouth Width
If you don’t have a dedicated bit sizer, don’t worry. You can get an accurate measurement using a few safe items from around the barn or house. A smooth wooden dowel, a piece of clean baling twine, or even a thick straw can work perfectly. The key is to choose something your horse will comfortably accept in its mouth. Gently place your chosen tool in your horse’s mouth where the bit would normally sit. Once your horse is relaxed, use a marker to note where the outside of its lips rest on both sides. Then, carefully remove the item and use a standard tape measure to find the distance between your two marks. This simple method gives you a reliable width measurement to guide your search for the perfect bit.
Using Calipers for Accurate Thickness Measurement
Beyond width, the thickness of the mouthpiece is a critical factor for your horse’s comfort. A bit that’s too thick can be cumbersome, especially for a horse with a low palate or a large tongue. For the most precise measurement, a pair of calipers is the best tool for the job. To measure, simply place the calipers around the mouthpiece right next to the cheek piece, as this is typically the thickest point. This measurement will help you select a bit that provides the right amount of pressure without causing discomfort. Once you have both the width and thickness, you’ll be well-equipped to find a comfortable and effective option in our collection of horse tack.
Creating a Calm Space for You and Your Horse
A calm, clean environment is essential for how to measure for a bit effectively. Choose a quiet spot free from distractions. Make sure your horse is relaxed and standing square on a level surface.
Gently handle your horse’s head, avoiding abrupt movements. Clean the horse’s mouth and your measuring tools before starting. This prevents discomfort and reduces the risk of infection.
If your horse is nervous, take time to soothe them. Soft words, gentle stroking, and treats can help build trust. The goal is to keep the horse still and comfortable, making the process safer and more accurate.
Staying Safe (and Why a Friend Helps)
Safety should always be your top priority when learning how to measure for a bit. Stand beside your horse’s head, not directly in front, to avoid sudden movements. Use calm, steady hands, and never force the horse’s mouth open.
Having a helper present significantly improves both accuracy and safety. Surveys show 80% of owners achieve the best results with someone to steady the horse and assist with tools. Communicate clearly with your helper to coordinate each step.
Always double-check your setup before measuring. Proper preparation protects both you and your horse, ensuring a smooth, successful experience.
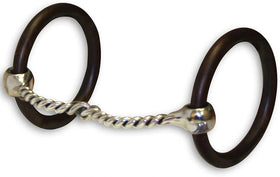
Shop This Post

Featured in this article
AV Bob Avila Double Ring Snaffle Horse Bit - Sweet Iron Mouthpiece, 3" Rings - Multiple Sizes
$165.00
Shop Now →

How to Measure Your Horse for a Bit: A Step-by-Step Guide
Accurate bit measurement is a crucial skill for every horse owner or rider. Following a step-by-step process ensures your horse’s comfort and performance, and minimizes the risk of common fit problems. This guide on how to measure for a bit will walk you through each stage, from evaluating your current bit to recording your findings for future reference.

Step 1: Start With Your Current Bit
Begin by examining the bit your horse is currently using. This provides valuable insight into how to measure for a bit that will fit correctly. Look for signs of wear or damage, such as sharp edges, uneven wear patterns, or corrosion. These issues may indicate an improper fit or the need for a replacement.
Next, observe how the bit sits in your horse’s mouth. Is there pinching at the corners, or are there visible mouth sores? If so, this is often a sign that the bit is either too narrow or too thick for your horse’s conformation.
If you have an existing bit, measure its length from the inside of one cheekpiece to the inside of the other. This measurement serves as a starting point for how to measure for a bit that is better suited to your horse’s needs. Keep a record of this measurement, as it will help you compare different bit styles and sizes during the fitting process.
Step 2: Get Your Measuring Tool Ready
The next step in how to measure for a bit is selecting the right measuring tool. Common options include a commercial bit sizer, a flexible cloth measuring tape, or a simple piece of string and a marker. Each tool offers unique advantages. Bit sizers provide quick, standardized results, while a tape or string can accommodate horses with sensitive mouths.
Before use, sanitize your chosen tool to prevent irritation or infection. Prepare a clean, quiet environment to help your horse remain calm throughout the process. Ask a helper to assist you in holding the horse steady, which greatly improves the accuracy of how to measure for a bit. Proper preparation ensures safety and leads to the most reliable measurement.
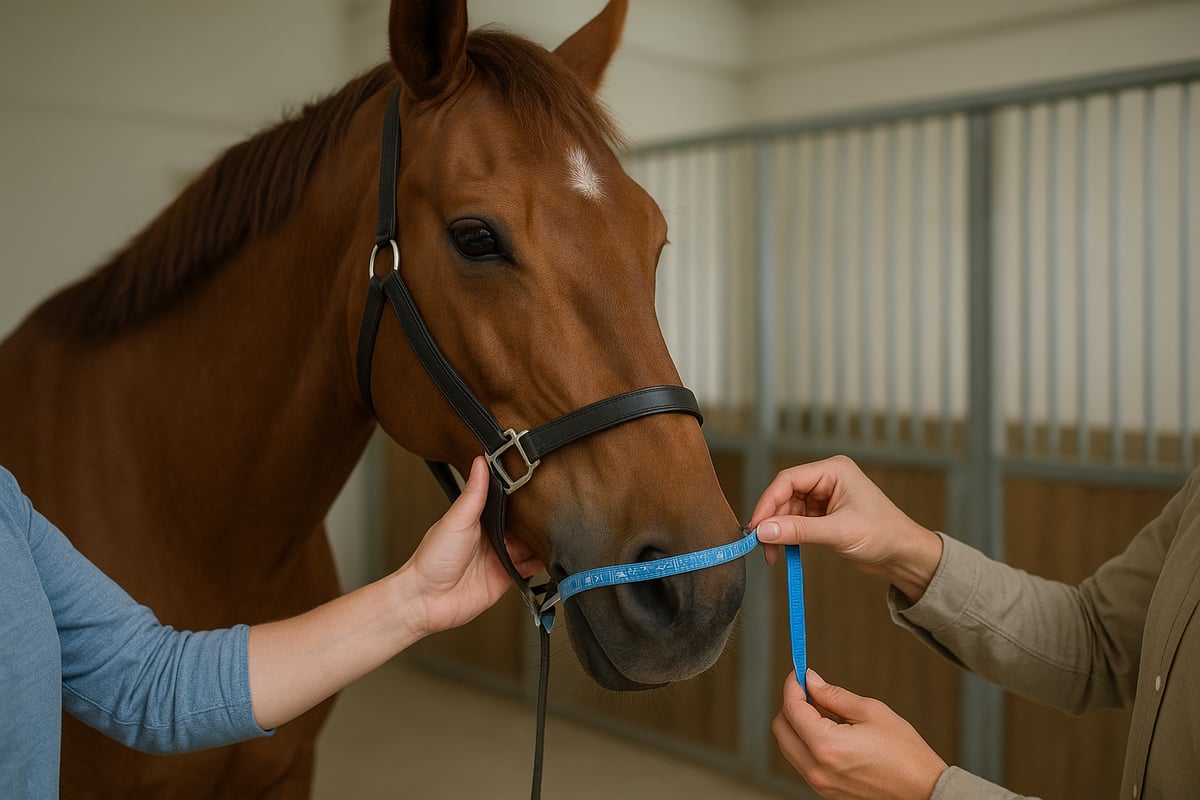
Step 3: Take the Mouth Width Measurement
Now, you are ready for the core step of how to measure for a bit. Gently place the tool or string across the horse’s mouth, positioning it at the commissures, or corners, of the lips. Make sure the tool is level and not pressing into the cheeks, as this could distort the measurement.
If using a string, mark the points where it meets the lips, then lay the string flat and measure the distance with a ruler. Record the result in both inches and centimeters for flexibility when comparing manufacturer sizing charts. This careful approach to how to measure for a bit ensures you capture your horse’s true mouth width, setting the foundation for a proper fit.
Step 4: Check Your Horse's Mouth Shape
Every horse’s mouth is unique, so it is important to account for individual anatomical features when learning how to measure for a bit. Examine your horse for thick lips, fleshy cheeks, or unusual dental structures. These factors can influence the ideal bit size and thickness.
For ponies, draft breeds, or horses with distinctive jawlines, consider adjusting your measurement up or down to accommodate their specific needs. If you notice dental irregularities or suspect discomfort, consult an equine dentist or veterinarian for further evaluation. Addressing conformation ensures your approach to how to measure for a bit is both thorough and tailored to your horse.
Identifying a Thick Tongue or Low Palate
A bit's fit isn't just about width—the space inside your horse's mouth is equally important. Some horses have a naturally thick tongue or a low palate (the roof of their mouth), which leaves less room for a bit. For these horses, a thick or even a standard single-jointed bit can create constant, uncomfortable pressure, sometimes making it hard for them to swallow. Taking a moment to assess this internal anatomy helps you choose a bit that works with their unique shape, not against it. This small step can make a huge difference in your communication and your horse's willingness to work.
You can get a good idea of your horse's mouth conformation by gently parting their lips when they're calm. Look to see if their tongue seems to fill the entire space between the bars of their mouth. If it does, you'll want to look for bits that offer more tongue relief. Options like double-jointed mouthpieces or bits with a "port"—a raised curve in the middle—are designed to create more space and distribute pressure more evenly. Selecting the right piece of horse tack is all about matching the equipment to your horse's specific needs for a comfortable and happy ride.
Step 5: Find the Right Bit Thickness
Understanding how to measure for a bit includes assessing the correct diameter for your horse’s comfort and responsiveness. Thicker bits distribute pressure more evenly and are often preferred for sensitive or green horses, while thinner bits provide more precise cues for experienced mounts.
Use a caliper or a ruler to measure the diameter of an existing bit. If you are starting from scratch, refer to manufacturer guidelines for recommended thickness based on mouth conformation. Matching diameter to your horse’s needs is a key aspect of how to measure for a bit, ensuring both effective communication and long-term oral health.
Understanding Common Bit Thickness Ranges
When you're looking at bits, you'll notice the mouthpiece comes in various thicknesses, typically ranging from 14mm to 18mm. The most common size you'll find is 16mm (about 5/8 of an inch), which serves as a great middle ground for many horses. As a general rule, a thicker bit tends to be milder because it distributes pressure more broadly across the horse's tongue and bars. This makes it a popular choice for young horses just learning to accept a bit or for those with particularly sensitive mouths. Finding the right piece of horse tack starts with understanding these fundamental differences in design and how they impact your horse's comfort.
On the other hand, a thinner bit concentrates pressure, allowing for more precise and subtle cues. This can be ideal for a well-schooled horse that understands refined aids. However, the most important factor is your horse's individual mouth conformation. A horse with a low palate or a large tongue simply may not have enough room for a thick mouthpiece, making a thinner bit a more comfortable option regardless of training level. As experts at SmartPak Equine note, a bit that is too thick or too thin can cause discomfort and resistance. The goal is to find that sweet spot where the bit fits the space in your horse's mouth perfectly, allowing for clear communication without causing pain.
Step 6: Double-Check Your Measurements
Accuracy is essential when following the steps of how to measure for a bit. Repeat the measurement process at least once to confirm consistency. Compare your findings against manufacturer sizing charts, which often list recommended bit sizes by breed, age, and discipline.
If you measured a 5.25-inch width, for example, check how this fits across various bit types, such as loose ring snaffles or D-rings. Interpretation is critical, as different cheekpiece styles can affect fit. Double-checking ensures your method for how to measure for a bit results in the best possible outcome for your horse.
Step 7: Write It Down and Take Notes
Once you have completed how to measure for a bit, keep a detailed record of your measurements. Include width, thickness, and any notes about your horse’s mouth conformation. This documentation is invaluable for future purchases, vet visits, or consultations with trainers.
Share your results with professionals or tack specialists to ensure you select the right bit. For further guidance on translating your measurements into the best bit choice, review Choosing the Right Bit for Your Horse, which offers expert advice on matching fit to function. By maintaining thorough records and seeking informed input, you maximize the benefits of learning how to measure for a bit and safeguard your horse’s wellbeing.
From Measurement to Mouth: Checking the Final Fit
Once you have your measurements, the final and most important step is to see how the bit actually fits in your horse's mouth. A number on a measuring tape is a fantastic starting point, but it doesn't account for the unique contours of your horse’s lips, tongue, and bars. This hands-on check is where you confirm that the bit is not just the right size on paper, but also comfortable and effective in practice. Taking a few extra minutes for this final assessment can make all the difference in your horse's comfort and willingness to accept the bit, turning a good measurement into a perfect fit.
The Wrinkle Rule for Snaffles and Curbs
A classic guideline for checking the height of a bit is the "wrinkle rule." After you’ve placed the bridle on your horse, take a look at the corners of their mouth. For most snaffle and curb bits, you should see one to two small, soft wrinkles. If you see no wrinkles and the bit seems low, it may clank against the teeth. If you see several tight, stretched wrinkles, the bit is too high and creating constant, uncomfortable pressure. The cheekpieces of your bridle should be snug but not tight, showing just enough tension to hold the bit quietly in place. This simple visual check is a reliable way to ensure the bit is positioned for clear communication without causing discomfort. Finding the right piece of horse tack is much easier when you know exactly what to look for.
Checking for Proper Width
After confirming the height, check the width. Gently slide the bit from side to side in your horse's mouth to feel for the right amount of space. Ideally, you should have about 1/8 to 1/4 of an inch of space between your horse's lips and the cheekpiece on each side. If the bit is too narrow, it will feel tight and have no room to move, which can pinch and rub the corners of the mouth. Conversely, if a bit is too wide, it will slide back and forth more than half an inch and can move unevenly across the tongue and bars, causing discomfort and delivering unclear signals. The correct width ensures the bit sits steadily and applies pressure only when you ask it to, which is fundamental for building trust and responsiveness with your horse.
What to Do When Bit Measurement Gets Tricky
Even with the right tools and preparation, you may encounter challenges when learning how to measure for a bit. Horses can be unpredictable, and unique mouth conformations or behaviors can make the process complex. Addressing these issues thoughtfully ensures you get the most accurate result.
Tips for a Fidgety or Anxious Horse
Some horses become anxious or resistant during bit measurement. To improve cooperation, choose a quiet area and have a trusted helper steady the horse. Approach calmly, using gentle voice and slow movements. If the horse tosses its head or pulls away, pause and allow it to relax before proceeding.
Safety is paramount. Always stand to the side of the horse's head, never directly in front. Proper restraint, such as a halter and lead rope, helps maintain control without causing stress. When learning how to measure for a bit, patience and positive reinforcement can make the process smoother for both you and your horse.
Working with Unique Mouths and Dental Quirks
Every horse's mouth is unique. Ponies, drafts, and foals often require special consideration due to size or anatomical differences. Horses with fleshy lips, thick tongues, or dental irregularities may need adjustments to the standard measuring approach.
If your horse is missing teeth or has an asymmetrical mouth, try using digital calipers for more precise readings. For particularly complex cases, consult your veterinarian or equine dentist. These professionals can provide expert guidance on how to measure for a bit when standard methods fall short.
Did You Measure Correctly? Signs to Look For
Even after careful measurement, signs of discomfort can indicate an issue. Watch for excessive chewing, head shaking, resistance to bridling, or sores at the mouth corners. These behaviors often signal that the bit does not fit as intended.
If you notice any of these issues, double-check your results. Compare your measurements to manufacturer sizing charts and consider trying a different tool or method. Being attentive to your horse's reactions is essential when determining how to measure for a bit accurately.
When to Call in a Professional
Sometimes, despite your best efforts, achieving a perfect fit is difficult. Research shows that 1 in 5 horses require custom-fit or specially adjusted bits. If you repeatedly encounter problems, do not hesitate to seek help from a tack specialist or equine dentist.
Regular fit assessments are crucial, as studies have found that over 25% of horses wear improperly sized bits (One in Four Horses' Bits Don't Fit, Research Finds). If you are unsure how to measure for a bit in a challenging case, professional input can prevent long-term discomfort and improve your horse's wellbeing.
You've Got the Size, Now What? Choosing the Right Bit
Selecting the right bit after learning how to measure for a bit is crucial for your horse’s comfort and performance. Accurate measurement is just the starting point. Now, you need to interpret those results and choose a bit that matches your horse’s unique needs.
Matching Size and Type to Your Horse
Start by matching the measured width and thickness to your horse’s mouth and discipline. Use your recorded measurements to compare against manufacturer sizing charts. Most adult horses require bits between 4.5 and 5.5 inches, but breed and training style can shift these numbers. If your horse needs a 5.25-inch bit, for example, check how this size fits across different mouthpiece and cheekpiece styles.
Refer to the chart below for a quick comparison:
| Bit Type | Typical Sizes (inches) | Best For |
|---|---|---|
| Snaffle | 4.5 – 5.5 | Everyday riding |
| Curb | 5.0 – 5.5 | Advanced, Western |
| Pelham | 4.75 – 5.5 | Versatility, jumping |
| Gag | 5.0 – 5.5 | Strong horses, leverage |
Always double-check how to measure for a bit based on the specific style you are considering, as fit can vary even between similar sizes.
Material, Mouthpiece, and Cheek Style
Next, consider the bit’s material and design features. Stainless steel, copper, or synthetic materials each affect comfort and sizing. Choose a mouthpiece that suits your horse’s sensitivity and experience. Single-jointed bits offer more tongue relief, while double-jointed or mullen mouthpieces provide steadier pressure.
Cheek style also matters. For instance, a 5-inch loose ring snaffle will fit differently than a 5-inch D-ring, even if the measurement matches. Review customer feedback and expert opinions to ensure your selected bit aligns with your horse’s anatomy and training needs. For a deeper dive on tack basics, see Horse Bridles and Tack Basics.
Trial, Error, and Professional Guidance
Once you’ve selected a bit, test it before committing. Place the new bit gently in your horse’s mouth and observe for signs of comfort or distress. Common indicators of poor fit include excessive chewing, head shaking, or resistance. Many riders find that moving from a 5-inch to a 5.25-inch bit resolves subtle contact issues, especially in sensitive horses.
If your horse continues to resist or shows discomfort, you may be facing a more complex fit problem. Our guide on Solving Pony Bit Resistance explores gentle solutions and how to measure for a bit when standard approaches fall short.
Ongoing Assessment and Maintenance
Bit fit is not a one-time task. Horses’ mouths can change over time due to age, dental work, or conditioning. Check fit regularly, especially after dental treatments or seasonal weight changes. Keep a record of each measurement and adjustment, so you are always prepared for future purchases or consultations with your vet or tack specialist.
By following these steps and understanding how to measure for a bit, you can ensure your horse enjoys optimal comfort and performance throughout the year.
What to Do if Your Horse is Between Sizes
It’s not unusual for your horse to measure somewhere between standard bit sizes, leaving you to decide between, for example, a 5-inch and a 5.25-inch bit. The general rule of thumb is to always size up. A bit that’s slightly too large is far more comfortable and safer than one that’s too small, which can pinch the corners of your horse’s mouth and cause sores. However, the final decision can also depend on other factors like your horse's unique mouth conformation and the specific cheekpiece style you choose. A loose-ring snaffle, for instance, fits differently than a fixed D-ring. If you're still uncertain, consulting with a tack specialist or your trainer can provide the clarity needed to select the right piece of horse tack for your partner.
Keeping the Perfect Fit: Bit Care and Check-ups
Proper bit care and regular fit checks are essential for your horse’s comfort and health. Understanding how to measure for a bit is just the beginning, as ongoing attention ensures your horse remains happy and responsive.
Your Daily Bit Cleaning and Inspection Routine
Consistent cleaning is crucial for bit longevity and your horse's oral health. After each ride, rinse the bit thoroughly to remove saliva and debris. Use a soft brush and mild soap for deeper cleaning weekly.
Inspect the bit for rough spots, sharp edges, or corrosion. If you notice any damage, replace the bit immediately to prevent mouth injuries. Integrating how to measure for a bit into your maintenance habits ensures you spot issues early and maintain proper fit.
How to Safely Clean and Sterilize a Bit
A clean bit is non-negotiable for your horse's health, especially if you're trying a new one or borrowing one that another horse has used. Before it ever goes in your horse's mouth, it needs to be sterilized. An easy, hands-off method is to run it through a hot cycle in your dishwasher. If you prefer to clean it by hand, grab a soft toothbrush and some surgical scrub. Give the bit a good scrubbing, let it sit for about 15 minutes, and then rinse it thoroughly. For an extra level of sanitation, you can soak it in a solution of one teaspoon of bleach per quart of water for 15 minutes. Just make sure you rinse it extremely well and dry it completely afterward to remove any chemical residue.
Using Bit Guards to Prevent Pinching
If you use a loose ring snaffle, you might notice it can sometimes pinch the corners of your horse’s mouth. A simple and effective solution is to use rubber bit guards. These small, flexible discs slide onto each side of the bit, creating a soft barrier between the metal ring and your horse’s cheek. They are an inexpensive piece of horse tack that can make a big difference in your horse's comfort. One important thing to keep in mind is that if you compete, you need to check the rules for your specific event. Some disciplines, like recognized dressage, don’t allow bit guards, so always confirm the regulations before heading into the show ring.
How to Spot Signs That the Fit Has Changed
Regularly check your horse’s mouth for signs of discomfort like sores, swelling, or resistance to the bit. Even subtle changes in behavior can signal a fit problem. Research, such as the Factors Influencing the Intra-Oral Movement of the Bit: A Cadaveric Study, highlights how bit design and rein tension impact comfort and fit.
Knowing how to measure for a bit helps you recognize when adjustments are needed. Routine observation keeps your horse comfortable and prevents the escalation of minor issues.
Making Small Adjustments for a Better Fit
Horses' mouths can change due to age, dental work, or weight fluctuations. Seasonal factors, like swelling from allergies or changes in condition, may affect bit fit. Always reassess how to measure for a bit if you notice behavioral changes or physical differences.
Keep a record of measurements and note any changes. Adjust the bit size or style as needed to maintain optimal fit and performance.
The Yearly Check-Up for Your Horse's Bit
Schedule yearly checks with your vet or equine dentist to assess bit fit and oral health. Horses’ mouth dimensions can change up to 0.25 inches over their lifetime, making annual reviews essential.
Document your findings and share them with trainers or tack specialists. Using how to measure for a bit as part of your regular care routine ensures your horse’s comfort and performance remain top priorities.
Now that you understand the importance of precise bit measurement for your horse’s comfort and performance, you’re ready to put your knowledge into action. Taking the right steps today not only helps prevent discomfort and behavioral issues, but also strengthens the bond between you and your horse. If you’re looking for quality bits or reliable measuring tools as discussed in this guide, you can trust Hooves and Paws for a wide selection and exceptional service. Let’s make sure your horse receives the best fit possible—explore our collection and Buy Now.
Scheduling Check-ups Every 6 to 12 Months
A horse's mouth changes throughout its life due to age, dental work, and conditioning, so a bit that fits perfectly today might not be comfortable a year from now. This is why scheduling regular check-ups with your veterinarian or equine dentist every 6 to 12 months is so important. These professionals can identify sharp edges on teeth and assess how the bit sits in relation to your horse's current oral anatomy. With studies showing that over a quarter of horses wear improperly sized bits, these routine visits are one of the best ways to catch potential issues early. Think of these annual reviews as proactive care that ensures your horse's long-term comfort and keeps your communication clear and effective.
Frequently Asked Questions
What should I do if my horse measures between two standard bit sizes? This is a common situation, and the safest rule of thumb is to size up. A bit that is slightly too wide is much more comfortable for your horse than one that is too narrow and risks pinching the corners of their mouth. A little extra space is manageable, but pinching can cause sores and resistance. Just be sure the bit isn't so wide that it slides excessively from side to side.
How often do I need to check my horse's bit fit? A horse's mouth can change over time due to age, dental work, or changes in their physical condition. It's a good practice to re-evaluate the fit at least once a year, or anytime you have their teeth floated. You should also do a quick check if you notice any new resistance or behavioral changes under saddle, as this can be one of the first signs that the fit is no longer ideal.
Is a thicker bit always a kinder option? Not necessarily. While a thicker mouthpiece distributes pressure over a wider area, it only works if your horse has enough room in their mouth to accommodate it. For a horse with a low palate or a thick tongue, a bulky bit can be incredibly uncomfortable and create constant pressure. The kindest bit is always the one that fits your horse's individual anatomy, regardless of its thickness.
My horse seems fussy with the bit. Could it really be a sizing issue? Absolutely. In fact, an improper bit fit is one of the most common culprits behind issues like head tossing, chewing, or resisting contact. Before assuming the problem is behavioral or related to training, checking the bit size should be your first step. A simple adjustment can often resolve persistent communication problems and make for a much happier horse.
What's the most common mistake to avoid when measuring for a bit? The biggest mistake is focusing only on the width measurement and ignoring the rest of your horse's mouth anatomy. A number on a measuring tape doesn't tell you if your horse has fleshy lips that could get pinched or a thick tongue that leaves little room for the mouthpiece. A truly accurate fit comes from considering the entire picture—width, thickness, and the unique structure inside your horse's mouth.
Key Takeaways
- Start with an Accurate Measurement: This simple step is the foundation for clear communication and can resolve common training issues like head tossing or resistance, which often stem from the discomfort of an ill-fitting bit.
- Look Beyond Just the Width: A truly comfortable fit also accounts for the bit's thickness and your horse's unique mouth shape. Check for things like a thick tongue or a low palate to ensure the bit isn't too bulky for the available space.
- Confirm the Fit on Your Horse: A measurement is your starting point, but the final test is in your horse's mouth. Use the "wrinkle rule" for proper height and check for 1/8 to 1/4 inch of space on each side of the lips to prevent pinching.


