


It’s easy to look at a pair of spurs and see a tool for punishment. That’s one of the biggest misconceptions in the equestrian world. When used correctly, spurs are not about force or making a horse go faster. They are a sophisticated tool for communication, designed to refine the conversation you’re already having with your leg. This is your official horse spur 101. We'll guide you through choosing a gentle, beginner-friendly pair of spurs and spur straps and using them to build a stronger, more responsive partnership with your horse.
Key Takeaways
- Use Spurs to Clarify, Not Command: Think of spurs as a tool for adding precision to your leg aids, not as a replacement for them. Always ask with your leg first and use a light touch from the spur only to reinforce your request.
- Start with the Right Equipment: For your first pair, select a gentle style designed for beginners. Spurs with short shanks and rounded ends, like ball-end or cloverleaf rowels, are forgiving and help prevent accidental pokes while you develop a steady leg.
- Master the Technique with Expert Guidance: Proper spur use depends on a quiet lower leg and precise timing. Always work with a trainer to learn how to apply a brief, gentle touch and to release the pressure instantly when your horse responds.
What Are Horse Spurs & How Do They Work?
Let's start with the basics. Spurs are tools that attach to a rider's boots, designed to help you communicate more clearly with your horse. It's easy to see them and assume they're for making a horse go faster or for punishment, but that's a common misconception. When used correctly, their real job is to refine the conversation you're already having through your leg aids. Think of them as a tool for adding punctuation to a sentence. Your legs ask the question, and a light touch from a spur can add a "please," clarifying your request and making your cues more precise.
They serve as an aid to give clear instructions, helping you train your horse and emphasize commands effectively. As the team at NRS World puts it, "Spurs are not just for looks; they are important tools for talking to your horse." The goal is never to cause pain but to achieve a higher level of understanding and responsiveness. By providing a more specific point of contact than the heel of a boot, spurs allow for subtle cues that a well-trained horse can easily understand. This ultimately strengthens the partnership between you and your horse, building a foundation of clear communication and trust. They are especially useful for riders with shorter legs or for horses that need a more refined signal to perform complex maneuvers.
The Anatomy of a Spur
Yoke, Shank, and Rowel
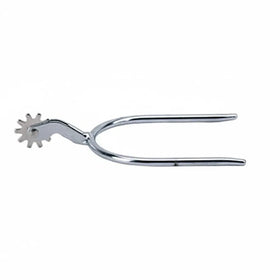
Every spur, no matter how simple or ornate, is made of three basic parts. First is the yoke, also called the heel band or branch, which is the U-shaped piece that wraps around the heel of your riding boot. Next, the shank, or neck, extends straight back from the center of the yoke. The length and shape of the shank play a huge role in how the spur works. Finally, at the end of the shank, you'll find the rowel. This is the part that makes contact with the horse, and it can be anything from a simple, rounded knob to a revolving wheel with points. Understanding these components is the first step in choosing the right pair of spurs for you and your horse, as each part can be modified to create a gentler or more direct cue.
A Brief History of Spurs
Spurs are far from a modern invention; they have a history stretching back thousands of years. Originally, they were essential tools for cavalry soldiers, used to guide warhorses with urgency and precision in the chaos of battle. As horsemanship evolved from a military necessity to a sport and art form, so did the purpose of the spur. Today, the focus has shifted entirely from force to finesse. Modern riding disciplines use spurs for precise communication, allowing a rider to deliver subtle, specific cues that a horse can easily understand. This evolution highlights the true function of spurs in contemporary riding: they are a sophisticated aid for clear conversation, not a tool for coercion.
Why Do Riders Really Use Spurs?
So, why add spurs to your riding gear? The main reason is to improve communication. Sometimes, a horse might ignore or misunderstand a cue given with just the leg. A spur provides a gentle, more distinct "nudge" to draw their attention back to your request. According to Farmhouse Tack, "Spurs help riders communicate better with their horses." They aren't meant to replace your leg aids but to support them. For example, if you're asking for a lateral movement like a side-pass, a light touch from a spur can help your horse understand precisely where to move from, making your training sessions more productive and less frustrating for both of you.
How Spurs Help Refine Your Leg Cues
Using spurs effectively is all about subtlety and timing. The golden rule is to always apply your leg cue first. Spurs should only come into play as a secondary aid to reinforce that initial request. As NRS World advises, "Always use your legs to cue your horse first. Spurs should only be used as a backup or to make a cue stronger." It’s crucial for new riders to learn how to apply them with a very light touch. Remember, "it's how you use the spur, not just the spur itself, that makes it gentle or harsh." The effectiveness of any piece of horse tack comes down to how you use it, ensuring it remains a tool for communication, not intimidation.
Western vs. English Spurs
While both Western and English spurs serve the same purpose—refining communication—they look and function quite differently. Western spurs are typically heavier and more ornate, often featuring a rotating wheel called a rowel at the end of the shank. The design of this rowel, from a smooth cloverleaf to one with more points, determines its severity. In contrast, English spurs are much simpler and lighter. They usually have a short, plain shank that ends in a rounded nub or a small, smooth disc, making them inherently gentler. When you're ready to shop for spurs, you'll notice these distinct styles right away. As Saddle Up Colorado explains, the main job of spurs is to help riders give clearer signals, and choosing the right style for your discipline is the first step in using them correctly and kindly.
Why Your First Spurs Need to Be Different
When you’re new to riding with spurs, it’s easy to think they’re all the same. But the truth is, the type of spur you choose matters immensely, both for your learning process and for your horse’s comfort. As a beginner, your leg position isn't always perfectly still, and your cues might not be as refined as an experienced rider's. That’s completely normal! The key is to select a spur that is forgiving and gentle, designed to clarify your aids without accidentally punishing your horse for a wobbly leg.
The goal of a spur isn't to force a reaction but to add a layer of precision to the cues you’re already giving with your legs. Think of it as a whisper, not a shout. For new riders, this means starting with a tool that helps you learn how to whisper effectively. Choosing the right beginner spur is about respecting your horse's sensitivity, prioritizing safety above all else, and understanding the facts behind common spur myths. This approach ensures you build a foundation of trust and clear communication with your horse from the very start.
First, Consider Your Horse's Sensitivity
Every horse has a unique personality and level of sensitivity. Some are stoic and less reactive, while others are incredibly responsive to the slightest touch. As a beginner, you need a spur that accounts for this, especially since your leg control is still developing. A mild spur prevents you from sending a loud, confusing signal when you only meant to send a soft one. For instance, cloverleaf-roweled spurs are known for being exceptionally gentle because their design distributes pressure softly. Choosing a spur that matches your horse’s temperament shows good horsemanship and helps you build a stronger, more trusting partnership.
Keeping You and Your Horse Safe
Safety should always be your top priority in the saddle. When it comes to spurs, this means understanding their proper role. Spurs are not a primary tool for steering or speed; they are a secondary aid meant to refine or back up your leg cues. You should always ask with your leg first. If your horse doesn't respond, a light touch from the spur can clarify the request. This "leg first" rule prevents you from over-cueing, which can startle or frustrate a horse. Using spurs responsibly is a key part of your journey with horse tack and ensures a safe, positive experience for both of you.
Let's Bust Some Common Spur Myths
There are a lot of misconceptions about spurs, and it’s important to separate fact from fiction. One common myth is that spurs with knobs or blunt ends are always gentler than those with rowels (the little wheels). In reality, a dull, single point of contact can sometimes be harsher than a rowel that rolls across the skin. Another myth is that a "hot" or nervous horse needs a stronger hand. The opposite is true. A sensitive horse will have a bigger reaction to pressure, so you need to be particularly gentle and precise with your cues to avoid causing anxiety.
Understanding Spur Severity
When you start looking at different spurs, you’ll notice they come in all shapes and sizes. This isn't just about style; the design directly impacts how severe the spur is. The two main things to look at are the shank length and the rowel. A longer shank, the part that extends from your heel, creates more leverage and requires less leg movement to make contact with your horse. This makes it a more severe tool, which is why beginners should stick to very short shanks. The rowel, or the spinning wheel at the end, is another key factor. Its shape, size, and the number of points it has all play a role in how your horse feels the cue.
Why More Points Can Be Milder
It might seem counterintuitive, but a spur with a spiky, multi-pointed wheel is often gentler than one with a simple knob. The secret is in how the pressure is applied. A rowel with many points actually distributes the pressure more evenly across your horse's side, making the cue much milder. Think of it this way: it’s the difference between being poked with a sharp pencil tip versus the flat end of an eraser. A single point concentrates all the pressure, while a rowel with ten or more points is designed to roll across the skin, creating a softer sensation. This is why a cloverleaf or multi-point rowel can be a surprisingly gentle choice.
What Are the Best Spurs for Beginners?
When you’re ready to add spurs to your riding toolkit, it’s important to remember that they are for refinement, not force. For new riders, the best spurs are those that are gentle, forgiving, and designed to prevent accidental pokes while you’re still developing a steady leg. The goal is to find a pair that helps you communicate more clearly without causing your horse any discomfort. Think of them as a way to whisper, not shout.
Choosing your first pair can feel overwhelming with all the different styles out there. To make it easier, we’ve focused on four types of spurs that are widely recommended for beginners. These options prioritize your horse’s comfort and help you learn to apply subtle, effective cues. Each one offers a different feel, allowing you to find the perfect match for you and your horse as you build your skills and confidence together.
Ball-End Spurs for a Softer Touch
If you’re looking for the kindest option available, ball-end spurs are an excellent choice. Just as the name suggests, these spurs feature a smooth, rounded ball at the end of the shank. This design is incredibly forgiving because it distributes pressure over a wider surface area, making it almost impossible to jab your horse.
Ball-end spurs are perfect for riders who are still mastering their leg control. They provide a gentle nudge that encourages your horse to move away from the pressure without any sharp discomfort. This makes them a fantastic tool for learning how to apply a cue effectively and building confidence in your communication. Many trainers recommend starting here to ensure your first experience with spurs is a positive one for both you and your horse.
Cloverleaf Rowel Spurs for Subtle Cues
The word “rowel” might sound intimidating, as many roweled spurs are quite severe. However, the cloverleaf rowel is a major exception. These spurs feature a small, spinning wheel shaped like a four-leaf clover with completely smooth, rounded edges. Unlike pointed rowels, the cloverleaf design is one of the mildest configurations you can find.
Because the rowel rolls along the horse’s side, it creates a dull, broad pressure rather than a sharp poke. This provides a clear but gentle cue that’s a small step up from a ball-end spur. They are a great option if your leg is fairly stable and you want to introduce a very subtle rolling action. You can find a variety of gentle horse tack designed to support clear communication.
The Classic & Versatile Prince of Wales Spur
A timeless favorite in the English riding world, the Prince of Wales spur is another solid option for beginners. This style has a short, flat end that is slightly squared off. While the flat tip makes it a little more distinct than a ball-end spur, it’s still mild enough for riders who are learning. It offers a great balance between gentleness and effectiveness.
This spur is ideal for riders who have a steady leg but find that a ball-end spur is too subtle for their horse. The Prince of Wales provides a more specific point of contact, allowing for a clearer cue without being harsh. Its classic design and functionality make it a popular choice that you can continue to use as your skills develop.
Short Shank Spurs for More Precision
The length of the shank, which is the part that extends from your heel, plays a huge role in a spur’s severity. For beginners, shorter is always better. Short shank spurs are ideal because they require less leg movement to make contact with the horse. This significantly reduces the risk of accidentally bumping your horse when you don’t mean to.
Many beginner-friendly styles, including ball-end and Prince of Wales, come with short shanks. When choosing the perfect spurs, focusing on a shorter shank length helps ensure your aids stay precise and intentional. It gives you more control as you learn to isolate your leg movements and apply cues with purpose.
Shop This Post

Featured in this article
Weaver Leather Heel Straps with Rubber - 8" Length - Durable Black Rubber and Leather Spur Straps
$13.75
Shop Now →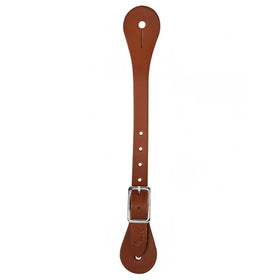

How to Choose Your First Pair of Horse Spurs
Once you and your trainer decide you’re ready, picking out your first pair of spurs can feel like a big step. It’s an exciting one, but it’s also important to get it right. The goal is to find a tool that helps you communicate more clearly, not one that causes confusion or discomfort. Think of it like finding the perfect pair of boots; the right fit and style make all the difference. When you’re shopping, focus on four key areas: the fit on your boot, the quality of the material, the length of the shank, and the shape of the end. Getting these details right will set you and your horse up for success.
Getting the Size and Fit Just Right
A spur that fits poorly is a spur that works poorly. If it’s too loose, it will slide down your heel, making your cues sloppy and ineffective. If it’s too tight, it will pinch your boots and be a pain to get on and off. The solution is simple: always try on spurs while wearing the boots you ride in. The spur band should rest securely on your boot’s spur ledge without wiggling or squeezing too hard. Most spurs have a little give, so you can gently bend them for a more custom fit. Getting the size right ensures your leg aids are consistent and clear every time.
Sizing for Men, Women, and Youth
Spurs are not a one-size-fits-all accessory. Just like your riding boots, they need to fit properly to work correctly. As the experts at Saddle Up Colorado note, "Spurs come in sizes for men, women, and children." This is because boot heels vary in width. Men's boots are generally wider, while women's and youth boots are progressively narrower. The U-shaped part of the spur, called the yoke, is designed to match these different widths. Choosing the right size category ensures the spur sits snugly on your boot's spur rest without slipping down or pinching. A secure fit is the foundation for clear, consistent communication with your horse.
With or Without Spur Straps?
Once you have the right size spur, you need a way to keep it on your boot. That's where spur straps come in. While some tight-fitting spurs might stay put on their own, most riders rely on straps for security. As Saddle Up Colorado explains, "Most western spurs have leather spur straps that secure the spur to the foot." Using a strap ensures your spur stays exactly where it should be, preventing it from sliding down your heel or, worse, falling off mid-ride. This stability is crucial for delivering consistent and accurate cues. You can find a wide variety of spurs and spur straps to match your style, from classic leather to durable nylon, so you can focus on your ride with confidence.
Why Quality Materials Matter in a Spur
When it comes to horse tack, quality equals safety and longevity. Good spurs are made from strong materials like stainless steel, which won’t rust or break under pressure. As you inspect a pair, run your finger along the edges of the band and shank. You want to feel completely smooth surfaces with no sharp edges that could accidentally scrape your horse or damage your equipment. Investing in a well-made pair from a trusted brand means you’re getting a reliable tool that’s designed to be both effective and kind, which is a priority for any caring rider.
Shank Length Explained: What You Need to Know
The shank is the part of the spur that extends from the heel band. Its length is a critical factor for beginners. Your goal should be to choose a shank length that lets you keep the spur from touching the horse when you don't want it to. For most new riders, this means starting with a very short shank, often one inch or less. A shorter shank minimizes the chance of accidentally bumping your horse if your leg position isn’t perfectly still yet. It gives you more control and ensures you only make contact when you intend to, making your cues deliberate and precise.
Why Rounded Ends Are Non-Negotiable
The part of the spur that actually touches the horse should always be gentle. Sharp points have no place in beginner riding. Instead, look for spurs with soft, rounded ends. Ball-end spurs, which have a smooth metal ball at the tip, are an excellent choice because they roll over the skin rather than poking. Another fantastic option is the cloverleaf rowel. These are some of the best spurs for beginners because they are among the mildest rowel configurations available. The rounded, spinning edges distribute pressure kindly, making them a safe and effective tool for refining your cues without causing discomfort.
Common Western Spur Styles and Features
Western spurs often have a distinct look compared to their English counterparts. They tend to be heavier and are famous for their intricate designs and, of course, the rowel. While a spinning wheel on your heel might seem intense, many Western disciplines require extremely subtle cues that a rowel can provide more effectively than a blunt end. Just like with any spur, the key is in the rider's hands—or rather, their legs. A skilled rider uses these tools for quiet, precise communication. From plain, functional designs to ornate, silver-inlaid showpieces, the world of Western spurs is vast, but the underlying principle of gentle reinforcement remains the same.
Barrel Racing vs. Mounted Spurs
Not all Western spurs are created equal; different disciplines call for different designs. For example, a barrel racing spur is built for speed and efficiency. It often features small, wavy ridges or a cloverleaf rowel on the inside of the heel band itself. This clever design allows a rider to apply a quick, subtle cue without having to turn their heel inward, saving precious seconds in a run. In contrast, a reining or cutting spur might have a longer shank and a different style of rowel designed for more intricate communication during complex maneuvers. Exploring different spurs and spur straps will show you just how specialized these tools can be for each job.
Helpful Features like Chap Guards
Beyond the shank and rowel, many Western spurs include thoughtful features that make a rider's life easier. One of the most practical is the chap guard. This is a small, upturned piece of metal at the top of the heel band that prevents your chaps or chinks from getting caught on the spur. It’s a simple but brilliant addition that protects your expensive leather gear from snags and tears. This feature is a great example of how quality tack is designed with the entire equestrian experience in mind, considering not just the horse but the rider's comfort and equipment preservation as well.
Beyond the Ride: Walking and Working in Spurs
Your time wearing spurs isn't limited to the saddle. You'll be walking around the barn, grooming your horse, and maybe even grabbing a drink from the house. Walking in spurs can be an art form in itself. Some riders find it easy, but if you tend to walk with your feet pointed slightly outward, you might find your rowels catching on the ground. Going down stairs requires a special technique; you’ll need to angle your feet about 45 degrees to avoid tripping. It’s also important to be mindful of your surroundings. Spurs can easily snag on ropes, lead lines, or even doorways if you turn too quickly, so developing a bit of spatial awareness is key to moving around safely and confidently on the ground.
Our Top Spur Picks for Beginners
Okay, you've decided you're ready to try spurs. Now comes the fun part: picking your first pair! With so many options out there, it can feel a little overwhelming, but the key is to start with something gentle that prioritizes your horse's comfort while helping you refine your aids. Beginner-friendly spurs are designed with shorter shanks and softer ends, ensuring you don't accidentally send a message that's stronger than you intend.
We've sorted through the options to find the best types for new riders. These recommendations are all about clear, kind communication, which is the foundation of great horsemanship. Remember, the right tool makes all the difference, and we're here to help you find the perfect fit in our horse tack collection. Let's look at a couple of excellent starting points.
For a Gentle Cue: Cloverleaf Rowels
If you're interested in a rowel spur, the cloverleaf design is one of the best places to start. These are considered some of the mildest rowel spurs available because the points are rounded and shaped like a clover. This unique design allows the rowel to roll gently along your horse's side, providing a soft cue rather than a sharp poke. They're perfect for riders who are still developing the feel for their leg aids and want to ensure their communication is always kind and effective. Think of them as a way to add a little more clarity to your leg cue without any harshness.
For Maximum Safety: Ball-End Spurs
For many trainers, ball-end spurs are the top recommendation for new riders, and for good reason. Their most important feature is the smooth, rounded ball at the end of the shank. This design makes it nearly impossible to accidentally jab or injure your horse, making them one of the safest choices you can make. Despite their gentleness, they still provide a distinct point of contact that helps your horse understand your leg cues more clearly. They offer peace of mind, allowing you to focus on your riding without worrying about being too sharp with your aids. They are a fantastic tool for building confidence for both you and your horse.
What to Look For, No Matter the Brand
No matter which style of spur you choose, the most important factor isn't the brand, but how you use it. Always remember that spurs are a secondary aid. They are meant to reinforce your leg cue, not replace it. First, you ask with your leg. If your horse doesn't respond, you can then apply a light touch with the spur to add emphasis. This principle is fundamental to developing a light, responsive horse and a strong partnership. When you're browsing for your first pair, look for quality materials and a simple design from our collection of best-selling products to ensure they are safe and built to last.
Browse our full range of equestrian spurs for beginners to find gentle, quality options with simple designs that are safe and easy to use from day one.
How to Use Spurs Correctly and Kindly
Using spurs is all about refining your communication, not forcing a reaction. Think of them as a tool for adding clarity to your leg aids, much like a whisper instead of a shout. When used correctly, spurs can help you give subtle, precise cues that your horse can easily understand. The key is to approach them with a focus on kindness, timing, and a light touch. Before you even strap them on, it’s important to understand the mechanics and the mindset behind using them effectively and humanely. This ensures the conversation between you and your horse remains clear, respectful, and productive.
How to Position Spurs Correctly on Your Boots
Getting the fit right is the first step to using spurs correctly. When you slide the spur onto your boot’s spur rest, the neck of the spur should always point downward. If it points up, you risk making unintentional and sharp contact with your horse. Most spurs also have a slightly longer branch on one side; this longer side goes on the outside of your boot to ensure a proper fit around your ankle. Once the spur is in place, secure it with spur straps so it’s snug but not tight. The goal is to keep all your horse tack from shifting around while you ride, giving you complete control over its use.
Remember: Spurs Are a Secondary Aid
Spurs should never be your first line of communication. They are a secondary aid, meant to reinforce a leg cue that your horse may have ignored. Always start by asking with your leg first. Apply gentle pressure with your calf and heel. If you don’t get the response you’re looking for, you can then follow up with a light touch from the spur. This method teaches your horse to listen to your initial, softer cue. Using a spur without first giving a leg aid is confusing for the horse and can make them anxious or dull to your signals over time. The idea is to make your leg cue stronger, not to replace it entirely.
It's All About a Light Touch and Good Timing
How you use a spur matters far more than the spur itself. A gentle tool can become harsh in the wrong hands, so learning to apply it with a light touch is essential. This requires a steady lower leg, as you don’t want to accidentally bump your horse with the spur. The cue should be a deliberate, soft roll or touch with your heel turned slightly inward. Just as important as the light touch is the timing of your release. The moment your horse responds correctly, remove the pressure immediately. This instant release is their reward and teaches them that they gave the right answer, encouraging them to listen more closely next time.
Applying Gentle Pressure with Confidence
Applying the spur correctly involves a subtle and controlled movement. Instead of kicking or jabbing, you’ll simply turn your heel inward to make contact. The amount of pressure should be minimal, just enough to get your horse’s attention and clarify your request. For riders new to spurs, it’s helpful to practice this movement at a standstill first, so you can get a feel for the motion without worrying about your horse’s forward movement. As you build confidence, you can start incorporating it into your rides. Remember, the goal is to be effective with the least amount of pressure possible, maintaining a respectful dialogue with your equine partner.
Is Your Horse Uncomfortable? Watch for These Signs
Learning to use spurs is just as much about listening to your horse as it is about giving cues. Your horse is your partner, and they’ll tell you if something isn’t right. Paying close attention to their body language is one of the most important skills you can develop as a rider. If you apply a spur and get a negative reaction, it’s not a sign to press harder; it’s a signal to pause and figure out what your horse is trying to communicate. This two-way conversation is the foundation of good horsemanship.
Sometimes, the signs are subtle, like a flick of the ear or a tense muscle. Other times, they’re much bigger and harder to miss. Understanding this feedback is key to building a trusting relationship and ensuring your aids are effective, not irritating. Before you even think about using spurs, you should be confident in your ability to read your horse's behavior. This will help you distinguish between a horse that’s testing you, one that’s being lazy, and one that’s genuinely uncomfortable. Remember, spurs are for refinement, not force. If your horse is confused or in pain, no amount of pressure will create a willing partner. It’s our responsibility as riders to make sure our requests are clear and fair.
Spotting Signs of Tension and Resistance
Often, the first signs of discomfort are small changes in your horse's way of going. You might notice your usually zippy horse becoming sluggish or even refusing to cooperate when you ask for a specific movement. They might pin their ears back, swish their tail irritably, or tighten their jaw. A horse that is usually soft and responsive might feel stiff or hollow through their back. These are quiet ways your horse says, "I'm not comfortable with this." It's your job to notice these subtle shifts and adjust what you're doing before the resistance gets louder.
How to Recognize Evasive Actions
If the subtle signs are missed, your horse may start to communicate their discomfort more loudly. These are the evasive actions that are impossible to ignore. As Andrea Equine notes, horses can show discomfort through actions like bucking, rearing, or biting. A sudden kick out, a hop, or aggressive tail swishing are all clear indicators that your spur cue was too much, too sharp, or simply not understood. Think of these as your horse shouting "no." When you see these behaviors, it’s a signal to immediately remove the pressure and reassess your approach.
Checking for Physical Signs of Discomfort
Beyond behavioral cues, it’s essential to physically check your horse’s sides after every ride, especially when using new equipment. Run your hand over the area where your spur would make contact. You’re looking for any signs of irritation, no matter how small. The earliest warning sign is often rubbed or broken hair. If you see this, it’s a clear signal that your leg may not be as steady as you thought, or you’re applying pressure too often or for too long. More serious signs include redness, swelling, or, in the worst cases, broken skin. These marks are never the goal and indicate improper use. If you find any irritation, it's important to address it immediately with proper care from your first-aid kit and reassess your technique with your trainer.
How to Respond if Your Horse Seems Uncomfortable
When your horse shows signs of discomfort, the first step is to stop using the spur. Go back to using your leg alone and see if you can get the desired response. If the behavior continues, it’s time to investigate further. Check that all your horse tack is fitting correctly, as a pinching saddle or girth can cause a horse to react negatively to any leg pressure. It’s also important to consider your horse’s temperament. For a sensitive or nervous horse, you’ll want to be particularly gentle in how you apply any aid. Always consult your trainer for guidance; they can help you troubleshoot the issue and refine your technique.
Are You Making These Common Spur Mistakes?
Spurs are incredible tools for refining communication, but like any tool, they can be misused, especially when you're just starting out. Learning to use them correctly means understanding the common pitfalls many new riders encounter. Being aware of these mistakes is the first step toward becoming a rider who uses spurs with finesse and kindness. It’s all about building a better partnership with your horse, and that starts with clear, gentle communication. Let's look at a few habits to avoid so you can use your spurs effectively and keep your horse happy and responsive.
Using Spurs as a Crutch, Not a Cue
This is probably the most common mistake. It’s easy to think of spurs as a "go" button, but they are meant to be a refinement of your leg cue, not a replacement for it. Your leg should always be the primary signal. Think of it this way: you ask with your calf first, and if your horse doesn't respond, you can reinforce that request with a light touch of the spur. Using the spur as the first signal can make your horse dull to your leg aids over time. He’ll start waiting for the spur instead of listening to your more subtle cues, which is the opposite of what you want.
Applying Way Too Much Pressure
A spur’s effectiveness comes from a light, precise touch, not from force. It’s how you use the spur, not just the type of spur, that determines if it’s a gentle tool or a harsh one. New riders sometimes accidentally jab their horse or maintain constant, nagging pressure because they haven't yet developed a stable lower leg. The goal is to apply a brief, soft touch to get a response, then immediately release the pressure. Constant contact can be irritating and painful for your horse, causing him to become tense, resentful, or even shut down completely. Always prioritize a gentle hand… or in this case, a gentle heel.
Forgetting to Use Your Other Aids
Riding is a full-body conversation with your horse, and all your signals need to tell the same story. A major mistake is giving conflicting aids. For example, if you’re asking your horse to move forward with your leg and spur but are unintentionally pulling back on the reins, you’re sending mixed messages. This can create a lot of confusion and frustration for your horse. If your hands, legs, and seat are all saying different things, your horse just feels confused. Developing an independent seat is key to ensuring all your cues are clear and working together in harmony.
Using Spurs on the Wrong Horse
Spurs are not a one-size-fits-all tool, and they aren’t appropriate for every horse, especially young or inexperienced ones. A green horse is still learning to understand and respond to basic leg pressure. Adding a spur into the mix too early can be overwhelming and frightening for them, potentially creating training issues down the road. It’s essential that a horse has a solid foundation and reliably responds to your leg aids before you even consider introducing a spur. They are a tool for refinement, and you can’t refine a cue that the horse doesn’t understand in the first place.
Blaming the Horse, Not the Rider
It’s a classic scenario: your horse isn’t responding, and your first thought is that he’s being stubborn or lazy. But great horsemanship means looking in the mirror first. A horse’s reaction is almost always a direct response to the rider's cue. If your horse pins his ears, kicks out, or tenses up when you apply a spur, he isn't being naughty; he's telling you the pressure was too sharp, confusing, or poorly timed. As Andrea Equine points out, these are clear signs of discomfort. Before blaming your equine partner, ask yourself if your leg is steady and your request was clear. The responsibility for effective communication always falls on the rider, and spurs are a tool to refine that conversation, not to win an argument.
So, Are You Ready to Use Spurs?
Spurs are a tool for refining communication, not a substitute for good horsemanship. Before you add a pair to your boots, it’s important to do an honest check-in on your skills and readiness. Using spurs effectively and kindly requires a solid foundation, expert guidance, and a commitment to practicing with a light touch. Let’s walk through what it takes to be truly ready, ensuring the experience is a positive one for both you and your horse. This isn't about rushing to the next level; it's about building a better partnership from the ground up.
Master These Riding Skills First
Before you even think about spurs, you need to have a steady, independent seat. This means your hands, seat, and legs can all work separately without affecting one another. Can you keep your lower leg still and quiet, even during transitions? If your leg swings or grips for balance, you aren't ready. Spurs are for riders with excellent leg control. They are designed to reinforce a cue, not create it. The correct sequence is to first ask with your leg. If your horse doesn't respond to that gentle pressure, you then turn your heel to apply a light touch with the spur. This makes your leg cue clearer and more precise, but it should never be the first signal you give. Mastering this foundation is essential for all your horse tack to work in harmony.
Why You Need Your Trainer's Go-Ahead
This is one area where you absolutely shouldn't go it alone. Your trainer is your most valuable resource when considering spurs. They can provide an objective assessment of your riding and let you know if your seat and legs are developed enough to use them correctly. A good trainer will also guide you in choosing the right type of spur for your discipline, your horse's temperament, and your skill level. More importantly, they will give you hands-on lessons to teach you the proper timing and feel. They can watch you ride, offer real-time feedback, and ensure you’re applying pressure correctly and kindly. Think of your trainer as your partner in this process, helping you build clear communication with your horse.
How to Practice with Spurs for the First Time
Remember, it’s how you use the spur, not just the spur itself, that makes it gentle or harsh. Your goal is to learn how to use them with a light, delicate touch. For your first pair, start with a very mild option, like ball-end spurs or those with a small, smooth rowel. These designs are more forgiving as you develop your feel. Before you even get in the saddle, you can practice turning your heel inward while standing on the ground to build muscle memory. When you do ride, focus on applying the spur as a brief, soft touch, not a constant pressure. This helps you build confidence in your cues and ensures your horse stays responsive and comfortable. Many of our best-selling products include gentle options perfect for new spur users.
Spurs in the Show Ring: Understanding the Rules
Once you and your horse are working well with spurs at home, you might start dreaming about competition. Stepping into the show ring is an exciting goal, but it comes with a whole new set of responsibilities—including a rulebook. When it comes to spurs, every discipline has specific regulations designed to ensure fair play and, most importantly, protect the welfare of the horses. These rules aren't there to trip you up; they exist to create a level playing field where good horsemanship and training are what get rewarded. Before you sign up for your first show, it’s crucial to understand the rules for your specific event.
Different governing bodies, like the United States Equestrian Federation (USEF) or the American Quarter Horse Association (AQHA), set the standards for everything from shank length to the type of rowel you can use. What’s perfectly acceptable in a reining class might be grounds for elimination in a dressage test. Taking the time to read the rulebook is a non-negotiable part of being a responsible competitor. It shows respect for the sport, your fellow riders, and your horse. Knowing you have the right equipment will give you the confidence to focus on what really matters: having a great ride.
Common Regulations for Shank Length and Rowels
While rules vary, you’ll find some common themes across most disciplines, especially concerning shank length and rowel design. The shank length is almost always regulated to prevent the use of a spur that provides excessive leverage or could be accidentally engaged too harshly. For example, the USEF generally specifies that spur shanks in many English disciplines cannot exceed a certain length. Similarly, rowels are closely scrutinized. Rules often dictate that they must be blunt, smooth, and free-spinning to prevent any sharp points from digging into the horse. The goal is to ensure the spur remains a tool for subtle communication, not a source of pain or injury.
Discipline-Specific Rules
This is where you need to pay close attention. In the world of dressage, where subtlety and harmony are paramount, the rules are very strict. You’ll often see riders using "dummy" spurs with no shank or ball-end spurs to maintain a light contact. The FEI, the international governing body, states that spurs must have a smooth end. In contrast, show jumping may allow for slightly more variety, but the emphasis remains on responsible use. In Western disciplines, the rules can change significantly from one class to another. A barrel racer’s equipment needs are very different from those of a Western pleasure rider. Finding the right pair of equestrian spurs that are both effective for your ride and compliant with your event’s rules is essential for a successful show day.
How to Clean and Care for Your Spurs
Just like any other piece of equipment, your spurs need a little TLC to stay in great shape. Taking a few minutes to clean and inspect them after your rides not only makes them last longer but also keeps them safe for you and your horse. A well-cared-for pair of spurs will function correctly and reliably, ensuring your cues are always clear and gentle. Think of it as part of your post-ride routine, a simple habit that protects your investment and your partner.
Your Guide to Cleaning and Storing Spurs
A little cleaning goes a long way. After every ride, make it a habit to wipe off any mud or wet dirt before it has a chance to dry and harden. A semi-soft brush works perfectly for this. For a deeper clean, you can soak your spurs in a chlorhexidine solution to sanitize them, then use a soft brush to gently scrub away any buildup. To keep everything moving smoothly and prevent rust, apply a light coat of non-toxic oil to the surfaces and any moving parts, like the rowel. When you’re done, store them in a cool, dry place away from direct sunlight to keep them in top condition.
How to Do a Quick Spur Safety Check
Your cleaning routine is the perfect time to give your spurs a quick safety check. Look them over for any signs of damage, like cracks in the metal or spots of rust. These issues can weaken the spur and make it unsafe to use. Pay close attention to the straps and buckles, making sure they are secure and in good working order. If you find a strap that’s frayed or a buckle that’s bent, it’s best to replace it right away. Catching these small problems early prevents them from turning into bigger issues in the saddle, ensuring all your horse tack remains dependable.
Related Articles
- Horse Spurs 101: The Ultimate Buyer's Guide
- How to Fit English Spurs on Boots: A Rider's Guide
- English Spurs with Rowels: A Complete Guide
Frequently Asked Questions
Are spurs supposed to hurt the horse? Absolutely not. When used correctly, spurs are a tool for communication, not punishment. Their purpose is to refine and clarify the aids you give with your legs, allowing for more subtle and precise requests. Think of it as a whisper to get your horse’s attention, not a shout. The goal is always to use the lightest touch possible to get a response, ensuring the experience is positive for your horse.
How do I know if my leg is steady enough for spurs? A great indicator is your ability to keep your lower leg still and quiet against your horse’s side, especially through transitions like walking to trotting. If your leg swings or you use it for balance, you risk accidentally bumping your horse with the spur. The best way to know for sure is to ask your trainer for an honest assessment. They can watch you ride and confirm if you have the independent seat needed to use spurs effectively and kindly.
My horse ignores my leg sometimes. Will spurs fix this? Spurs can help, but they aren't a replacement for a proper leg aid. They are designed to be a secondary cue, meaning you should always ask with your leg first. If your horse doesn’t respond to that initial, gentle pressure, a light touch from a spur can reinforce the request. Using a spur as your primary "go" button can make a horse anxious or even less responsive to your leg over time, so mastering that "leg first" sequence is key.
What's the most important thing to look for when buying my first pair? For your first pair, the two most critical features are a short shank and a gentle end. A short shank, typically one inch or less, gives you more control and reduces the chance of making accidental contact. For the end, look for something smooth and rounded, like a ball-end spur or a cloverleaf rowel. These designs distribute pressure kindly and are much more forgiving for riders who are still developing their feel.
What should I do if my horse reacts badly when I use a spur? A negative reaction, such as pinning ears, swishing the tail aggressively, or kicking out, is clear communication from your horse that the cue was too sharp, confusing, or uncomfortable. Your first step should be to immediately stop using the spur and go back to using only your leg. It’s a signal to reassess your technique with your trainer, who can help you work on your timing and pressure to ensure your aids are fair and understandable.


