


Finding the perfect shank bit for your horse can feel like searching for a needle in a haystack. You know the right one can transform your communication and control, but the wall of options is just overwhelming. It’s a critical choice, and you shouldn't have to guess. This guide is here to give you clear, straightforward advice. We'll walk through everything from different shank styles to getting the perfect fit, helping you choose a bit that builds confidence for both you and your horse.
With countless styles, materials, and features now available, selecting the best fit for your horse and riding goals can feel daunting. That is why this guide brings you expert insights, step-by-step instructions, and practical comparisons to help you make a confident, informed decision.
Inside, you will discover everything you need to know, from understanding shank bits and types, to mastering fit, materials, and maintenance. Let us get started, so you can choose the right shank bit for you and your horse this year.
What Is a Shank Bit and How Does It Work?
Selecting the right shank bit can transform your riding experience. To make an informed decision, it’s crucial to understand the function, anatomy, and terminology associated with these specialized bits. Let’s break down what sets a shank bit apart and how it impacts communication between rider and horse.
The Purpose of a Shank Bit in Horse Riding
A shank bit is a type of leverage bit designed to enhance rider cues through indirect pressure. Unlike a snaffle, which applies direct pressure, a shank bit uses long sidepieces (shanks) to multiply the force applied by the reins. This leverage action allows for more nuanced communication, especially in advanced Western disciplines like reining and cutting.
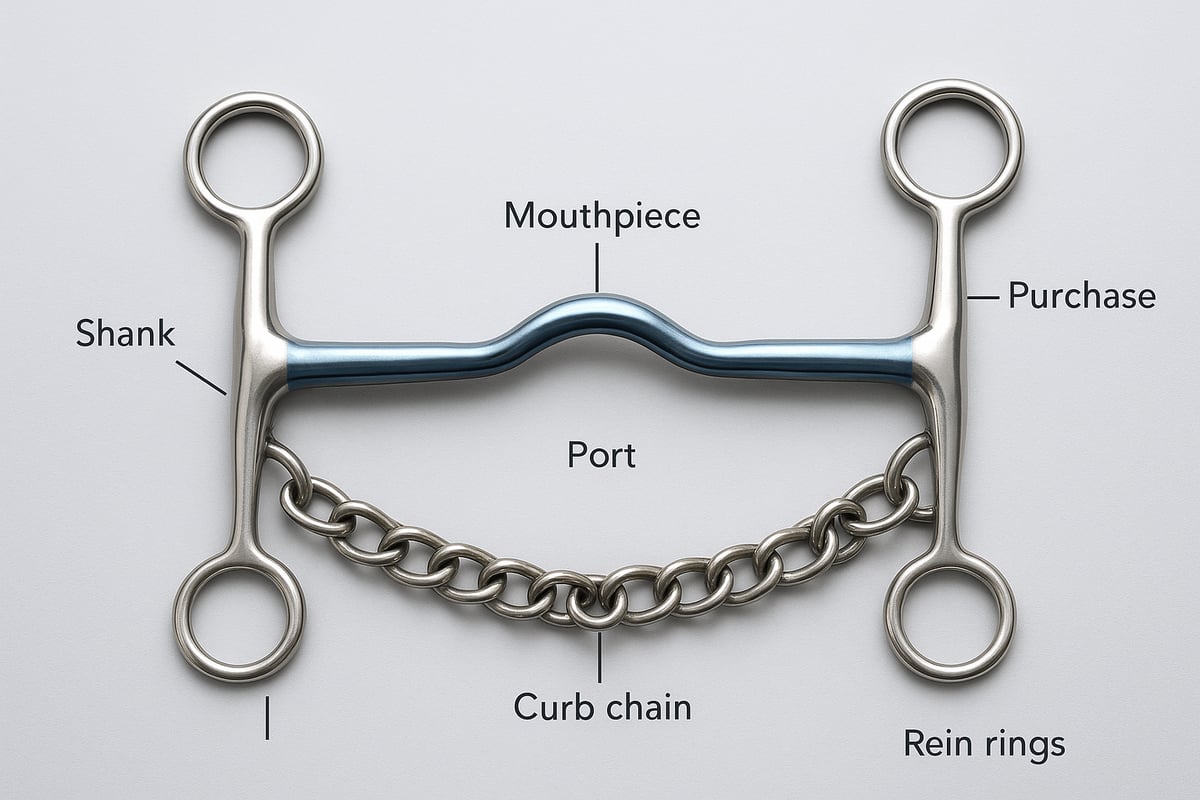
Key terminology every rider should know includes:
- Shank: The side arm extending below (and sometimes above) the mouthpiece.
- Mouthpiece: The part that rests inside the horse’s mouth.
- Port: The raised area at the center of the mouthpiece, allowing tongue relief.
- Curb Chain: A strap or chain that sits under the horse’s chin, engaging when the shank rotates.
- Purchase: The section of the shank above the mouthpiece.
- Rein Ring: The attachment point for the reins at the end of the shank.
Leverage action means the longer the shank, the greater the force applied with minimal rein movement. For example, a short-shank bit offers mild leverage and is often used for horses in transition, while a long-shank bit provides increased precision for seasoned competitors.
The anatomy of a shank bit directly influences how a horse responds to cues. The shape, length, and mouthpiece style all play roles in comfort and effectiveness. According to recent industry data, the use of shank bits has grown in advanced training programs due to their ability to refine communication. For a deeper dive into anatomy and function, explore this comprehensive overview of bit anatomy and shank bit function.
Understanding Leverage and Pressure Points
To use a shank bit effectively, it’s important to understand how it communicates with your horse. The magic is in the leverage and the specific points where pressure is applied. When you know how these elements work together, you can give clearer, gentler cues.
How Leverage Magnifies Rein Aids
A shank bit works through leverage, which means it multiplies the signal you send through the reins. Unlike a snaffle that applies one-to-one pressure, a shank bit uses its sidepieces—the shanks—to amplify your cues. This allows a small movement from your hands to create a clearer, more significant signal for your horse. The length of the shank determines the amount of leverage. Shorter shanks offer a milder effect, making them a good choice for horses transitioning to a curb bit. Longer shanks provide more precision, which is why you often see them on highly trained horses in competitive events. Finding the right balance is key to clear communication, and it starts with exploring quality horse tack designed for your discipline.
Key Pressure Points: Mouth, Chin, and Poll
When you apply rein pressure, a shank bit engages several points on the horse's head to deliver a cue. The primary points are the bars of the mouth (the toothless space), the tongue, the chin via the curb strap, and the poll, which is the sensitive area behind the ears. As you pull the reins, the shanks rotate backward, tightening the curb strap under the chin and applying downward pressure on the poll. At the same time, the mouthpiece acts on the tongue and bars. Understanding this network of pressure is essential for using the bit correctly and ensuring your horse's comfort. It’s the foundation of effective communication and helps you give subtle cues instead of relying on force.
Weighing the Pros and Cons of Shank Bits
Shank bits offer several notable advantages, especially for experienced horses and riders seeking subtlety and control. However, they also come with risks if used improperly.
Advantages:
- Allow for precise, refined cues with minimal rein movement.
- Effective for advanced maneuvers in disciplines like reining or pleasure riding.
- Suitable for horses that have completed basic training and respond well to indirect pressure.
Disadvantages:
- Risk of harshness if the shank bit is misfitted or misused.
- Can cause discomfort or confusion in young, green, or sensitive horses.
- Require a knowledgeable rider with soft hands to avoid over-cueing.
When considering a shank bit, it’s vital to match the bit to both the horse’s temperament and the rider’s experience level. Some trainers prefer shank bits for achieving specific training outcomes, such as enhancing collection or responsiveness. However, they stress the importance of gradual introduction and ongoing monitoring for signs of resistance or discomfort.
In summary, understanding the function and anatomy of a shank bit builds the foundation for effective and compassionate riding. The next sections will guide you through types, fit, and expert selection strategies.
A Guide to Different Types of Shank Bits
Choosing the right shank bit can be overwhelming with so many styles available in 2025. Understanding the main types, their unique features, and how they suit different riding goals is essential for making an informed decision. Let's explore what's trending and how specialty designs can be tailored to both horse and rider.
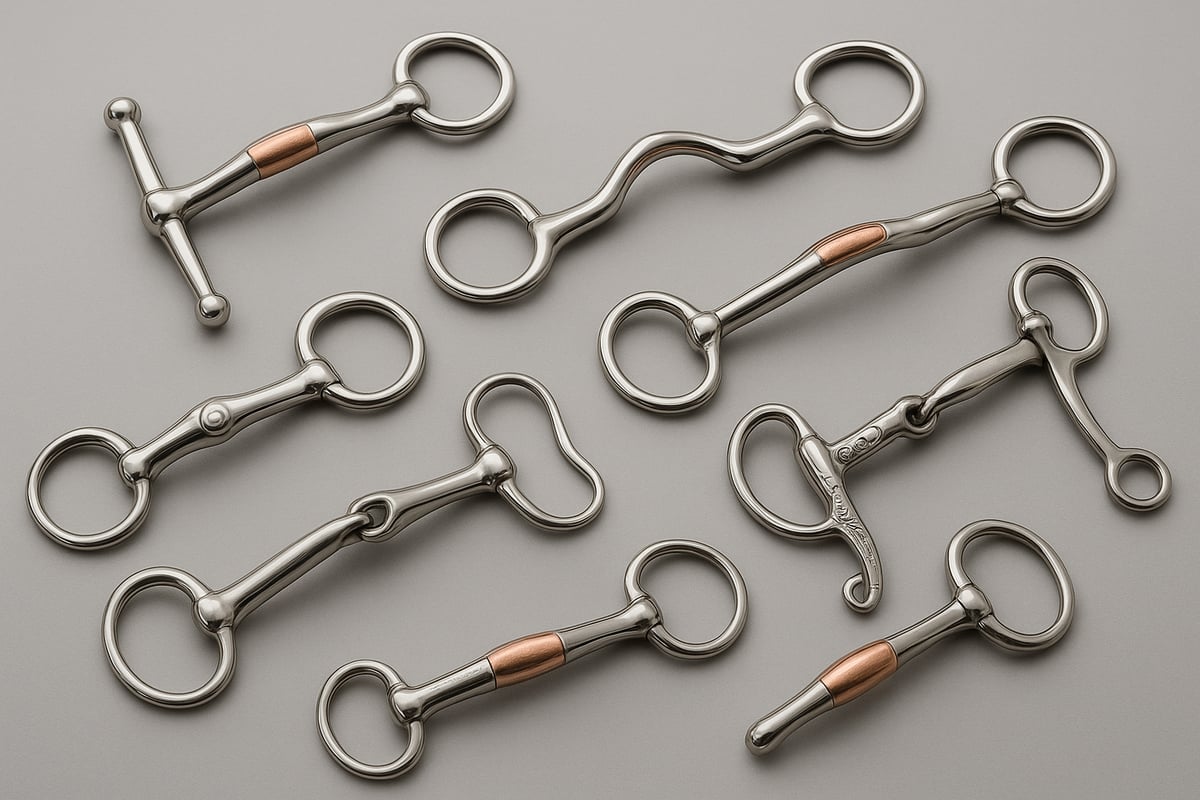
Exploring Popular Shank Bit Styles
The shank bit market has expanded rapidly, with over 700 models now featured on leading retailer sites. Riders in 2025 can choose from a wide array of styles, each designed for specific communication, control, and comfort needs.
Some of the most sought-after shank bit styles include:
- Curb Bits: Known for their leverage action, these are a staple in Western disciplines.
- Correction Bits: Featuring movable mouthpieces or ports, they offer subtle adjustments for advanced training.
- Ported Bits: Designed with various port heights to relieve tongue pressure and enhance comfort.
- Combination Bits: Merge features from different styles, sometimes including a chain mouthpiece or a roller for added versatility.
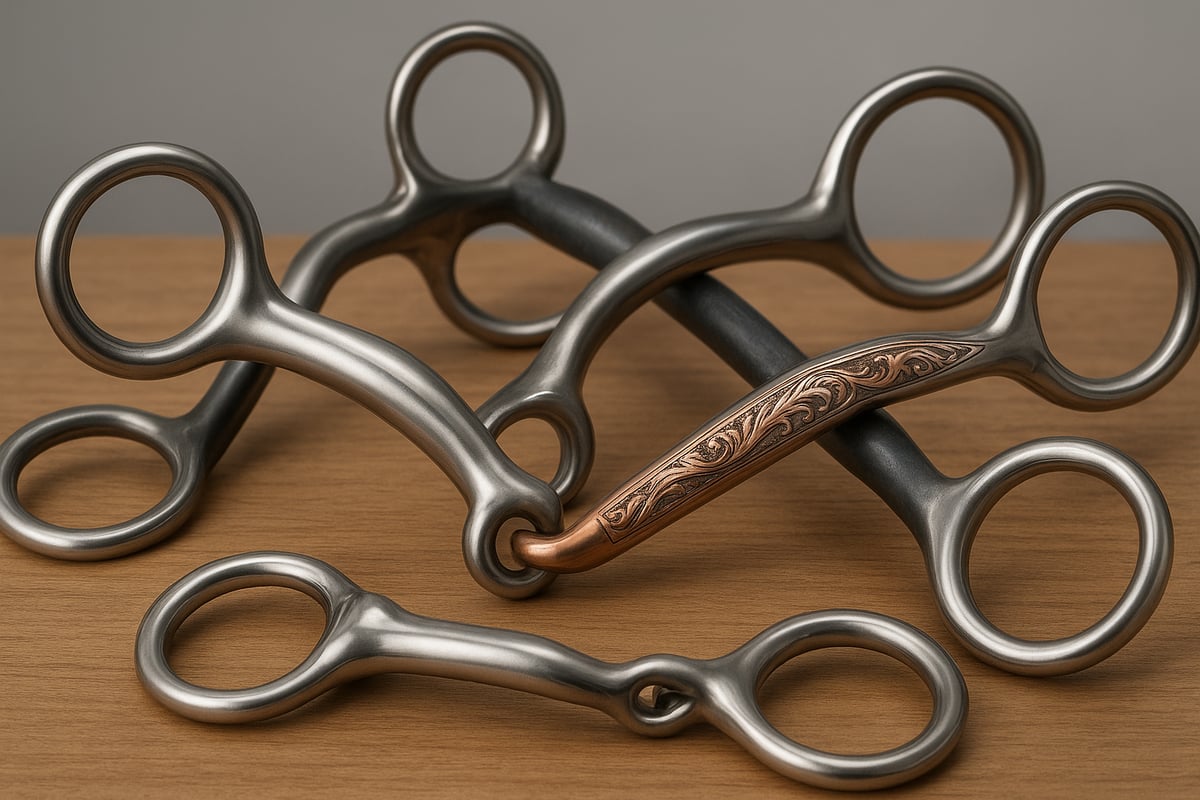
Unique features are common among modern shank bit designs. Riders now see options with hinged ports, 3-in-1 mouthpieces, and rollers that encourage relaxation and salivation. For example, the Advantage Klapper is popular for its gentle leverage and copper inlays, while the Long Horizon model is favored for its precision in reining competitions.
Material and finish choices are broader than ever. Stainless steel remains the go-to for durability and rust resistance. Sweet iron and copper inlays are valued for promoting softness and bit acceptance, especially for horses with sensitive mouths.
Below is a quick comparison of short shank and long shank bit actions:
| Feature | Short Shank Bit | Long Shank Bit |
|---|---|---|
| Leverage | Milder | Stronger |
| Cue Precision | Subtle | More defined |
| Suitable For | Green or sensitive horses | Advanced, trained horses |
| Common Use | Trail, pleasure | Reining, cutting, show |
When deciding on a shank bit, also consider your riding discipline. Reining and cutting typically require more nuanced bits, while trail and pleasure riding benefit from milder designs.
For riders looking to browse popular options or compare models, the Bits and Curbs Collection offers a comprehensive selection of shank bits to suit every need.
Fixed Shanks
Fixed shank bits are built with a stationary shank that does not move independently of the mouthpiece. This solid construction provides a direct and consistent signal from your reins to your horse's mouth. Because the leverage and pressure are so predictable, it's an excellent choice for riders who value clear, stable communication and for horses that respond well to straightforward cues. If you want a bit that delivers the same feel every time you pick up the reins, a fixed shank is a reliable and effective option for maintaining steady contact and control.
Swivel or Loose Shanks
In contrast, swivel or loose shank bits feature shanks that move independently from the mouthpiece. This design allows for more flexibility and can soften the communication between you and your horse. When you apply a rein aid, one side can engage without affecting the other, giving your horse a clearer, more isolated signal. This style is ideal for encouraging a softer response and is particularly useful for sensitive horses or for refining specific movements. Many riders find this flexibility helps them select the perfect piece of horse tack for achieving nuanced lateral control.
S-Shanks
S-shank bits get their name from their distinct 'S' curve. This unique shape changes the timing and leverage of the bit's action compared to a straight shank. The curve alters how quickly the curb strap engages and how the pressure is distributed, often resulting in a slightly delayed and smoother signal. This provides a more nuanced method of communication, giving the horse a moment to prepare for the cue. Riders often choose S-shanks when they want to refine their signals without resorting to a longer, straight shank, making it a great tool for achieving subtle control.
Beyond the Basics: Specialty and Custom Bits
As horse and rider preferences become more specialized, custom shank bit solutions are gaining traction. Custom shank shapes, unique mouthpieces, and decorative elements like silver overlay or engraving provide not just visual appeal but also functional benefits tailored to individual needs.
Benefits of custom shank bit design include improved fit for horses with atypical mouth conformation, as well as the ability to address specific training challenges. Riders with particular rein handling styles or horses with unique sensitivities can work with bit makers to select mouthpiece thickness, port height, and shank length that optimize both comfort and control.
Decorative elements are not just for show. Smooth welds, balanced construction, and high-quality materials ensure longevity and safety, while custom engraving or dot patterns add a personal touch. With the rise of 3D bit configurators, equestrians can now visualize and build their ideal shank bit online, adjusting every detail before ordering.
In 2025, the trend toward personalization in shank bit design is stronger than ever. Whether you need a mild bit for a young horse or a precision tool for competition, the market offers solutions that combine innovation, quality, and artistry.
Shop This Post

Featured in this article
AV Bob Avila Double Ring Snaffle Horse Bit - Sweet Iron Mouthpiece, 3" Rings - Multiple Sizes
$165.00
Shop Now →

How to Find the Perfect Shank Bit Fit for Your Horse
Selecting the right shank bit begins with understanding the critical role of precise fit. A well-fitted shank bit enhances communication, comfort, and safety for both horse and rider. Poor fit can lead to resistance, behavioral problems, and even injury. This section covers how to measure your horse and make adjustments so your shank bit works optimally in every ride.
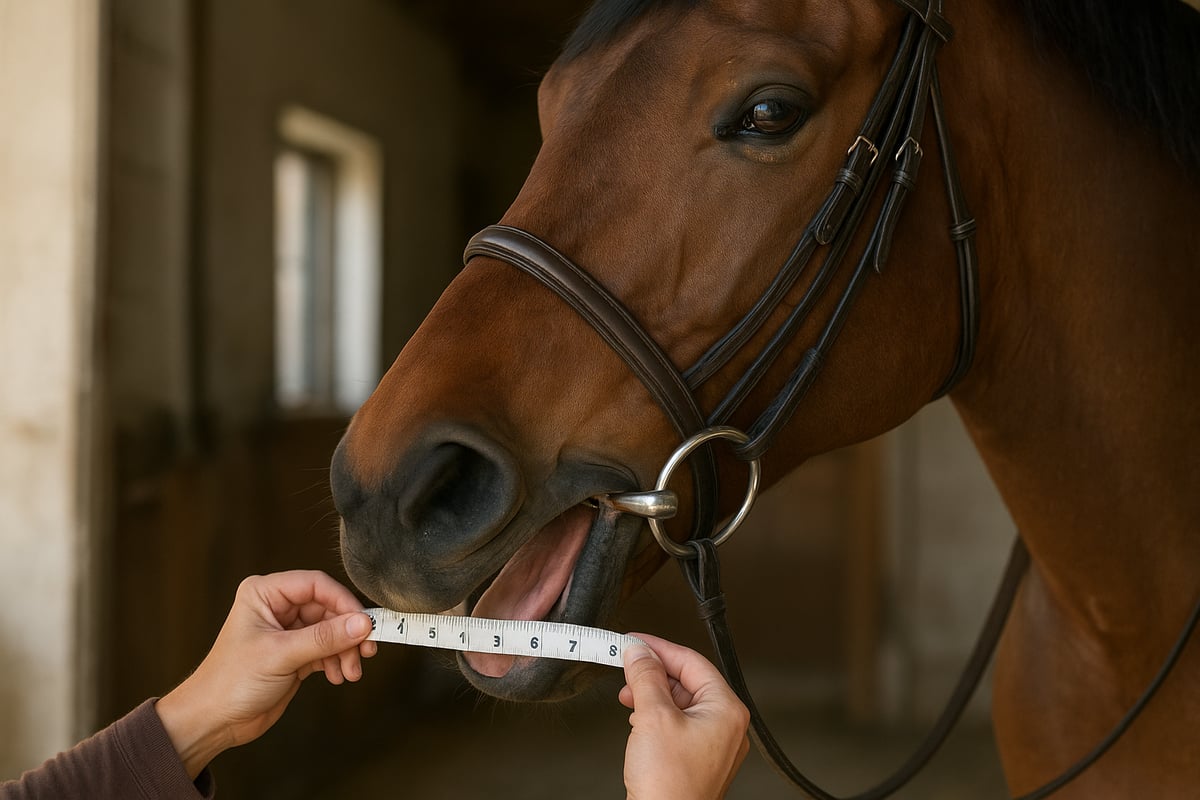
How to Measure Your Horse for a Shank Bit
Getting accurate measurements is the foundation of finding a comfortable, effective shank bit. Start by measuring your horse’s mouth width using a soft tape or a bit sizer. Place the tape gently across the mouth, from lip to lip, while your horse is relaxed. Most adult horses measure between 4.75 and 5.25 inches, but breed and individual conformation can vary.
Next, assess bar thickness by feeling along the gums between the front and back teeth. Horses with thicker bars may benefit from a wider mouthpiece, while those with thinner bars often need a more slender design. The palate height is another consideration. Horses with low palates require bits with low or medium ports to prevent discomfort and pressure points.
Signs of a poor shank bit fit include:
- Head tossing or frequent mouth opening
- Reluctance to accept the bit or difficulty bridling
- Visible sores or calluses at the corners of the mouth
- Resistance to rider cues or sudden changes in behavior
For example, using a shank bit that is too wide can cause lateral movement, pinching, and a lack of responsiveness. A bit that is too narrow may pinch the lips and cause sores. Industry guidelines recommend matching mouthpiece length to your measurements, with about 1/8 inch of clearance on each side for comfort.
Here is a quick reference table for common breeds and suggested shank bit sizes:
| Breed/Type | Typical Mouth Width | Recommended Shank Bit Size |
|---|---|---|
| Quarter Horse | 5" | 5" to 5.25" |
| Thoroughbred | 4.75" – 5" | 4.75" to 5" |
| Warmblood | 5.25" | 5.25" |
| Pony | 4" – 4.5" | 4.5" |
When trying a new shank bit, always observe your horse’s response and start with short, gentle sessions. Use a bit guard if needed to prevent pinching during the trial period.
How to Adjust Your Shank Bit Correctly
Proper adjustment is just as important as measuring for a shank bit. Begin by attaching the curb chain, ensuring it lies flat and engages at a 45-degree angle when the reins are activated. Too tight a chain increases severity, while too loose reduces control and clarity of cues.
Set the headstall and cheekpieces so the shank bit sits comfortably at the corners of your horse’s mouth, creating one or two soft wrinkles without pulling the lips. Placement that is too high causes constant pressure, while too low may lead to the bit banging against the teeth.
Common fit issues include uneven contact, excessive movement, and resistance to signals. If your horse shows discomfort, check for sharp edges or improper mouthpiece alignment. For young horses or those new to a shank bit, trainers recommend starting with shorter shanks and milder mouthpieces, gradually increasing complexity as the horse advances in training.
Regularly reassess fit as your horse’s mouth changes with age or conditioning. Consult with a professional or use resources like Proper Bit Fit and Adjustment Techniques for hands-on guidance and troubleshooting.
Remember, every horse is unique. Even with correct measurements, fine-tuning may be necessary for optimal comfort and performance. A well-fitted shank bit supports clear communication and builds trust between you and your horse.
What Are Shank Bits Made Of? A Guide to Materials
Selecting the right materials and construction is key to finding a shank bit that offers both durability and comfort. The choices you make here directly affect how your horse responds, how long the bit lasts, and how well it performs in daily use.
From Stainless Steel to Sweet Iron: Common Bit Materials
The most popular materials for shank bit construction are stainless steel, sweet iron, and copper inlays. Each material brings unique benefits and considerations for horse comfort and longevity.
Stainless steel is favored for its resistance to rust and impressive durability. This makes it a solid choice for riders in humid or wet climates. Sweet iron, on the other hand, is designed to encourage salivation, which can help horses accept the shank bit more readily. Over time, sweet iron develops a light patina that many horses find appealing.
Copper inlays are often added to shank bit mouthpieces to promote softness and acceptance. The warmth and taste of copper can be especially beneficial for horses that tend to have a dry mouth.
Here is a quick comparison of common shank bit materials:
| Material | Benefits | Best For | Drawbacks |
|---|---|---|---|
| Stainless Steel | Rust resistance, durability | All climates, daily use | Can be cold, less taste |
| Sweet Iron | Promotes salivation, acceptance | Dry-mouthed horses | Rusts, needs cleaning |
| Copper Inlays | Softness, bit acceptance | Sensitive, fussy horses | Wears over time |
Choosing the right shank bit material should be based on your horse’s sensitivity, the climate, and your riding discipline. For a deeper dive into how different materials can influence horse comfort and responsiveness, see Bit Materials and Their Effects on Horse Performance.
Some riders prefer sweet iron for horses that show reluctance to accept a stainless steel shank bit, especially if their horses are prone to a dry mouth.
Why Quality Craftsmanship Matters in a Shank Bit
The craftsmanship behind a shank bit is just as important as the choice of materials. High quality bits feature smooth welds, balanced construction, and attention to detail. These factors prevent sharp edges or weak points that could harm your horse or affect communication.
Decorative elements are common in premium shank bit designs. Silver overlays, engraved dots, and custom etching not only add visual appeal but can also reflect the rider’s style. However, these details should never compromise function.
Key craftsmanship features to look for include:
- Even, smooth welds with no rough spots
- Symmetrical shank arms for balanced pressure
- Securely attached mouthpieces and rein rings
Proper craftsmanship ensures that a shank bit lasts for years and stays comfortable for your horse. Investing in a well-made shank bit can range in price from $100 to over $980, depending on the materials and level of detail.
Ultimately, the combination of premium materials and skilled construction determines how well a shank bit performs, how comfortable it is for your horse, and how long it will serve you in training or competition.
How to Choose the Right Shank Bit for You and Your Horse
Selecting the right shank bit is a process that requires careful consideration of both horse and rider. Ensuring a good match can make the difference between clear communication and ongoing frustration.
First, Consider Your Horse's Needs and Temperament
Start by evaluating your horse’s training stage, temperament, and mouth anatomy. A young or green horse may respond best to a milder shank bit with a simple mouthpiece, while a seasoned competitor could benefit from more sophisticated designs.
Consider your horse’s past experiences with bits. If your horse has shown sensitivity or resistance, opt for gentle materials and shorter shank lengths. Horses with thicker tongues or low palates may need a specific port style for comfort. Always prioritize your horse’s comfort and responsiveness when choosing a shank bit.
Snaffle vs. Shank: Listening to Your Horse's Preference
It's essential to understand the fundamental difference between how snaffle and shank bits work. A snaffle bit applies direct pressure to the bars of your horse's mouth, making it effective for teaching lateral movements like bending left and right. In contrast, a shank bit uses leverage. When you pull the reins, the shanks rotate and engage a curb strap, creating indirect pressure across the horse's jaw. This action is better suited for encouraging vertical flexion, or tucking the nose in, which is common in more advanced riding disciplines. Neither bit is inherently better; they simply communicate with your horse in different ways.
Ultimately, your horse is the best judge of which bit works. Pay close attention to their response. A horse that is comfortable and understands your cues will be soft, responsive, and relaxed. If they are tossing their head, gaping their mouth, or resisting your aids, they might be telling you the bit is uncomfortable or the pressure is confusing. Don't be afraid to switch bits if one isn't working. The goal is always clear and gentle communication, and finding the right piece of horse tack is a key part of that conversation.
Matching the Bit to Your Skill Level and Goals
Honest self-assessment is crucial. Riders new to leverage bits should start with a basic shank bit that offers mild action and clear feedback. If you are advancing in your discipline or aiming for higher-level competition, consider whether you are prepared to handle a more complex shank bit.
Training advice often emphasizes gradual transitions. Moving too quickly from a snaffle to a shank bit can create confusion for both horse and rider. Consult with a trainer to gauge your readiness and to select a shank bit that matches your riding ambitions and skill set.
Proper Use and Training with a Shank Bit
A shank bit is a tool for refinement, not a shortcut for control. Using one effectively requires understanding how it communicates with your horse and having the right skills to use it gently. It’s about subtle cues and a partnership built on a solid training foundation. Before you even think about putting a shank bit in your horse's mouth, it's essential to grasp the principles of how it works and when it's appropriate to use one. This knowledge ensures you're helping your horse, not hindering them, and that you're selecting the right horse tack for their stage of training.
Encouraging Vertical Flexion vs. Lateral Flexion
Shank bits are specifically designed to encourage vertical flexion, which is when a horse softens its jaw and tucks its nose inward toward its chest. This response is created by the bit’s leverage action, which, along with a curb strap, applies even pressure across the horse's lower jaw. Think of it as a cue for the horse to collect itself. In contrast, a snaffle bit applies direct pressure to one side of the mouth at a time, making it perfect for teaching lateral flexion—the side-to-side bending essential for steering and suppleness. Because a shank bit engages the entire mouth, it's a fantastic tool for refining straightness and collection in a finished horse, but it's not the right choice for teaching a green horse the basics of bending and turning.
Riding with Seat and Leg Aids
When you switch to a shank bit, your primary mode of communication needs to shift. Because you lose some of the direct, side-to-side guidance you get with a snaffle, you must rely more heavily on your seat and leg aids to direct your horse's movement. This is why shank bits are best suited for riders with quiet hands and an independent seat. Your body, not just the reins, becomes the main tool for steering and cueing. This advanced level of riding ensures that the bit is used for subtle refinement rather than as a primary means of control, preventing harshness and confusion for your horse.
When Not to Use a Shank Bit
It's crucial to recognize that a shank bit is not the right tool for every situation. These bits are intended for advanced riders on well-trained horses. If your horse hasn't mastered basic commands and responsiveness in a simpler snaffle bit, introducing a shank bit can create more problems than it solves. It should never be used to "fix" issues like pulling or head tossing, as these often stem from foundational training gaps. According to equine experts, a horse should be soft, responsive, and understand all cues before you even consider a shank bit. Using one prematurely can cause pain, fear, and resistance, undoing much of your hard work.
Choosing a Shank Bit for Your Discipline
Each discipline has unique requirements for shank bits. Western riders in reining, cutting, or trail riding often select bits based on the level of control and subtlety needed. For example, reining horses may perform best with a medium shank bit that provides precise cues, while trail riders might prefer a softer, more forgiving design.
English disciplines rarely call for a shank bit, but when allowed, rules regarding mouthpiece style and shank length are strict. Always check competition regulations before making your choice. Matching your shank bit to your discipline ensures effectiveness and compliance.
A Simple Checklist for Choosing a Shank Bit
Follow these steps for a confident selection process:
- Identify your riding goals and discipline needs.
- Assess your horse’s mouth conformation and past bit experiences.
- Choose a shank length that matches your control requirements.
- Select a mouthpiece style suited to your horse’s comfort.
- Prioritize quality materials and craftsmanship.
- Test the shank bit, monitor your horse’s response, and adjust as needed.
For a more detailed breakdown of each step, consider reading Choosing the Right Bit for Your Horse for additional expert insights.
Common Bit-Fitting Mistakes (And How to Avoid Them)
Many riders make the mistake of choosing too severe a shank bit for their horse’s level. Over-bitting can cause resistance, discomfort, and even injury.
Other common errors include ignoring signs of poor fit, neglecting to consult with trainers, or failing to observe competition rules. Always monitor your horse for behavior changes such as head tossing or reluctance to accept the bit.
Remember, the right shank bit supports clear communication and long-term partnership. Avoiding these mistakes helps ensure your horse’s comfort and your success in the saddle.
How to Care For Your Shank Bit
Proper care and maintenance of your shank bit are crucial for the health of your horse and the effectiveness of your ride. A well-maintained shank bit not only lasts longer but also ensures consistent communication and comfort. Regular attention to cleaning, inspection, and fit can prevent discomfort and potential injury for your horse.
The Right Way to Clean and Store Your Bit
Establishing a daily cleaning routine is the foundation of shank bit longevity. After each ride, rinse the shank bit thoroughly with warm water to remove saliva and debris. Use a soft brush to clean hard-to-reach areas, especially around joints and decorative elements. For stainless steel bits, a mild soap can help maintain shine and prevent buildup.
Dry the shank bit completely before storing to avoid moisture-related damage. For bits made of sweet iron or copper, drying is especially important, as these materials can develop surface rust if left damp. Store your shank bit in a clean, dry location, away from humidity and direct sunlight. Hanging bits on a bridle rack or using a padded storage bag can protect against scratches.
Regularly inspect your shank bit for sharp edges, cracks, or excessive wear. Addressing minor issues early can prevent discomfort or injury to your horse. For more detailed tack care advice, consider reading Horse Bridles and Tack Basics, which provides a broader context for maintaining all parts of your horse’s gear.
Regular Checks for Your Horse's Comfort and Safety
Ensuring your horse’s comfort with a shank bit requires ongoing attention. Before each ride, check the fit and placement of the bit in your horse’s mouth. Signs of poor fit, such as rubbed areas, sores, or reluctance to accept the bit, should be addressed immediately.
Rotate between different bits when possible to prevent the development of pressure points or habituation. Introducing a new shank bit should be done gradually, allowing your horse to adjust over several short sessions. Always handle the bit with clean hands and avoid dropping or bending it, as even minor damage can impact function.
If you notice behavioral changes or resistance, investigate whether the shank bit is contributing to discomfort. Regular inspections and mindful use are key to sustaining both safety and performance for your horse.
Is It Time for a New Shank Bit? Signs to Look For
Recognizing when to replace your shank bit is vital for both horse welfare and rider success. Look for clear signs such as cracks, deep scratches, worn joints, or loss of finish. If the shank bit no longer sits evenly in the horse’s mouth or shows visible distortion, it is time for a replacement.
Advancements in 2025 have introduced new materials and ergonomic designs, making upgrades more appealing, especially for competitive riders. Upgrading to a custom or specialty shank bit can address unique anatomical needs or specific training goals. For expert guidance on bit selection and knowing when to upgrade, visit Selecting the Right Bit for Your Horse.
Timely replacement and thoughtful upgrades ensure your shank bit continues to provide comfort, control, and reliability ride after ride.
Frequently Asked Questions About Shank Bits in 2025
Choosing the right shank bit can feel overwhelming with so many options and new technologies available. Below, we answer the most common questions riders have about shank bit selection, use, and care in 2025.
Can a shank bit be used on young or green horses?
A shank bit is generally not recommended for young or inexperienced horses. These bits use leverage, which increases the intensity of the rider’s cues. Most trainers suggest starting with a snaffle before transitioning to a shank bit once the horse understands basic rein aids and has developed a soft mouth.
What is the difference between a curb bit and a correction bit?
Both are types of shank bit, but they serve different purposes. A curb bit uses a solid or jointed mouthpiece with leverage action for refined cues. A correction bit features a ported mouthpiece with moving parts, designed to address specific training issues. Riders choose between them based on the horse’s needs and responsiveness.
| Bit Type | Purpose | Typical Use |
|---|---|---|
| Curb Bit | General control, precision | Advanced riding, showing |
| Correction Bit | Address specific issues | Training adjustments |
How do I know if my horse prefers a certain material?
Horses may show a preference for a shank bit made from sweet iron, copper, or stainless steel. Signs of preference include increased salivation, softer jaw, and willingness to accept the bit. If your horse appears dry-mouthed or resistant, trying a different material can help improve comfort and acceptance.
Are there legal restrictions on shank bits in competitions?
Yes, most organizations have rules governing which shank bit designs are permitted. Western events often allow more variety, while English disciplines may restrict shank bit use. Always check the rulebook for your specific discipline and level before entering a show.
How often should I replace my shank bit?
Inspect your shank bit regularly for cracks, sharp edges, or excessive wear. Replace it if you notice any damage or if the finish has worn away, as this can cause discomfort or injury. On average, high quality bits last several years with proper care.
What are the signs of a well-fitted versus poorly fitted bit?
A well-fitted shank bit sits comfortably in the horse’s mouth, with no pinching or excessive movement. Signs of poor fit include head tossing, refusal to accept the bit, mouth sores, or unresponsiveness. Always measure your horse’s mouth and consult sizing guides before purchasing.
Where can I find expert help for bit selection and fitting?
Consulting a professional trainer or bit fitting specialist is the best way to ensure your shank bit fits correctly. For more information on western riding gear and expert selection, visit the Western Riding Essentials collection for guidance and resources.
What trends and questions are most common among riders in 2025?
Top concerns include proper fit, material choice, and legal compliance. According to major retailer FAQs, riders frequently ask about transitioning to a shank bit, recognizing signs of discomfort, and how to safely introduce new bits. Staying informed and seeking guidance helps ensure both horse and rider benefit from the right shank bit.
Now that you have a clear understanding of what goes into choosing the right shank bit—from fit and materials to matching your horse’s needs and your own riding goals—you’re ready to make a confident decision that supports your horse’s comfort and your performance. At Hooves and Paws, you’ll find a carefully curated selection of quality shank bits and accessories, all backed by decades of expertise and free US shipping. If you’re ready to put these expert tips into practice and find the perfect fit for 2025, you can Buy Now and equip your horse with confidence.
Key Takeaways
- Understand Leverage for Clearer Communication: A shank bit works by amplifying your rein cues, making it a tool for refining signals with a trained horse. It's not for teaching basic steering but for adding nuance to an established conversation.
- Prioritize a Custom Fit for Your Horse's Comfort: The right bit starts with the right measurements. Consider your horse’s mouth anatomy, shank length, and mouthpiece style to prevent discomfort and ensure the bit functions as intended.
- Match the Bit to Your Riding Foundation: A shank bit requires quiet hands and strong seat and leg aids. Before making the switch, be honest about your skill level—this tool is meant to complement your aids, not replace them.


