


With its shanks, curb chain, and multiple rings, the Pelham bit can look a little intimidating at first glance. It’s easy to wonder if it’s too strong or complicated for your horse. The truth is, it’s an incredibly versatile tool that offers refined communication and better control—when used correctly. It’s all about understanding how it works. This guide is here to show you just that. We'll break down how to choose the right one, ensure a perfect fit, and use it with clear, effective aids so you can ride with confidence.
This comprehensive guide delivers expert insights, practical tips, and the latest trends so you and your horse can enjoy improved comfort and performance. You will discover everything you need to know about pelham bit anatomy, key uses, selection criteria, fitting advice, riding techniques, maintenance, and answers to common questions.
Unlock advanced tips from equestrian professionals and master the pelham bit for your modern riding success. Read on and elevate your equestrian journey.
The Pelham Bit Explained: How It Works
The pelham bit stands out as a versatile tool in modern equestrian practice. Serving as a hybrid between snaffle and curb bits, the pelham bit combines the direct action of a snaffle with the leverage of a curb. Its history traces back to the 19th century, evolving as riders sought a single-bit solution for control and refinement. Unlike the double bridle, which uses two separate bits, the pelham bit streamlines tack while offering nuanced communication. Popular in English disciplines like hunter, jumper, and equitation, it remains a staple. For more on how the pelham compares to other designs, see Types of horse bits explained.
What is a Pelham Bit?
A pelham bit is recognized as a hybrid, blending features of both snaffle and curb bits. This unique design allows riders to apply both direct and leverage pressure, making the pelham bit adaptable for multiple styles. Originally developed for military and sporting use, its popularity grew as riders valued simplicity and control. Unlike double bridles, the pelham bit requires only one mouthpiece, reducing complexity. It is commonly seen in disciplines such as show hunters, jumpers, and even some driving events. According to recent surveys, over 30% of English show riders have used a pelham bit in competition.
The Anatomy of a Pelham Bit
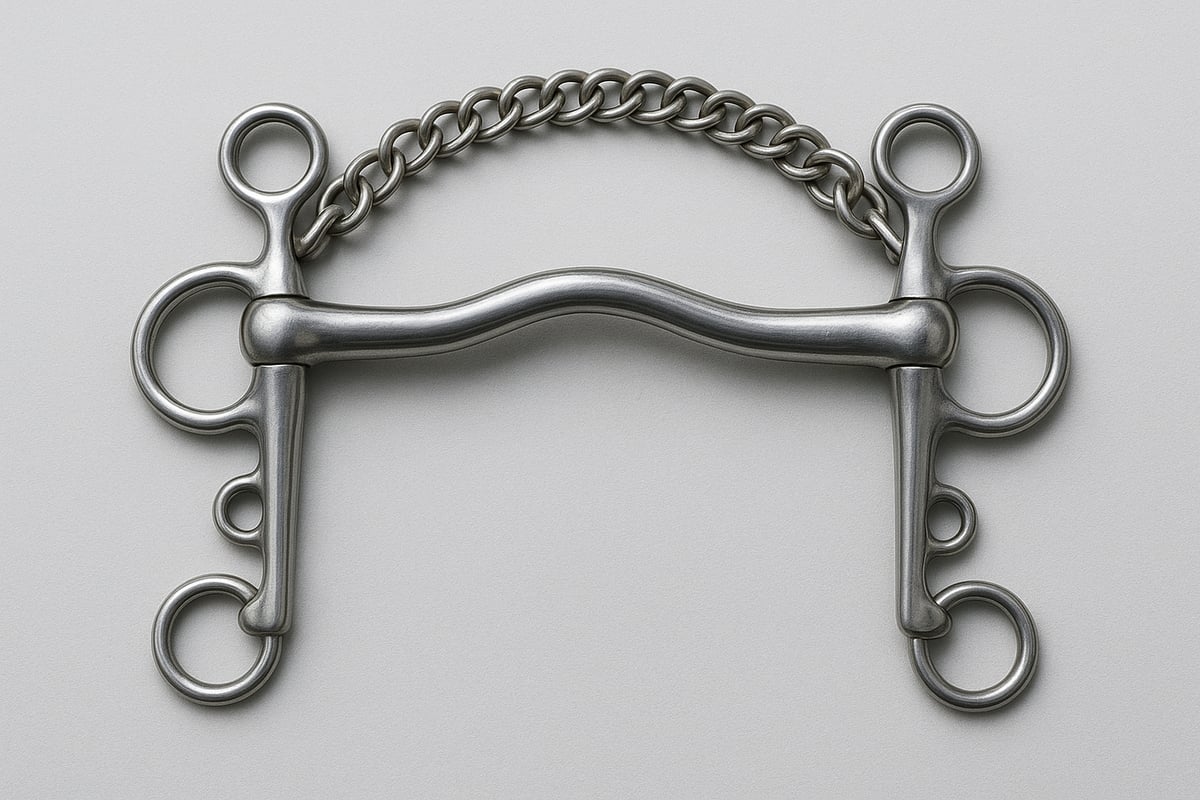
The pelham bit consists of several key parts, each serving a distinct role. The shanks, which come in various lengths, determine the level of mechanical leverage. Short shanks offer milder action, while longer shanks increase control. The mouthpiece may be jointed (allowing flexibility) or solid (providing stability), and materials range from stainless steel to rubber for different pressure effects. The curb chain helps distribute pressure under the chin, crucial for the bit’s effectiveness. Rein attachments allow double rein use or roundings for simplified handling. Popular configurations include the mullen mouth pelham and French link pelham.
How the Pelham Bit Works
The pelham bit operates by combining direct and leverage action. When the snaffle rein is engaged, it applies direct pressure to the horse’s mouth for straightforward cues. The curb rein, when used, creates leverage that affects the poll, chin, and tongue, encouraging the horse to lower its head and increase responsiveness. This dual system offers precision, especially for experienced riders. However, misuse can lead to discomfort or resistance. Studies indicate that improper handling or fitting of the pelham bit accounts for up to 15% of reported rider errors in show settings. Proper technique and safety awareness are essential for optimal results.
Understanding Leverage and Shank Length
The pelham is known as a "leverage bit," which simply means it can amplify the pressure from your rein aids. When you engage the curb rein, the bit's shanks act like levers, multiplying the force you apply. These shanks typically range from two to four inches long. The key is the ratio between the upper shank (from the mouthpiece to the cheekpiece) and the lower shank (from the mouthpiece to the rein ring). A longer lower shank relative to the upper shank increases the leverage, giving you more control with subtle cues. Understanding this mechanic is crucial when selecting the right horse tack for your specific needs and your horse's sensitivity.
Where a Pelham Applies Pressure
A pelham bit communicates with your horse by applying pressure to several areas of the head, depending on which rein you use. The mouthpiece itself puts pressure on the tongue, the bars of the mouth (the toothless space in a horse's jaw), and the lips. When you use the curb rein, it activates the leverage action, which applies pressure to the poll—the sensitive area right behind the ears—encouraging the horse to lower its head. At the same time, the curb chain tightens gently against the chin groove. This combination of pressure points allows for clear and nuanced signals when used correctly by a rider with steady hands.
The Role of the Mouthpiece
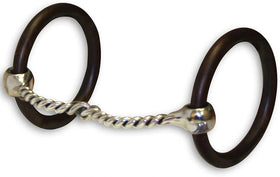
Pelham bits come with different mouthpieces, and each one changes how pressure is distributed in your horse's mouth. A solid, straight bar known as a "Mullen" mouthpiece spreads pressure evenly across the tongue and bars, making it a milder option for many horses. A mouthpiece with a "port," which is a raised curve in the middle, creates more space for the tongue but concentrates pressure on the bars. In contrast, jointed mouthpieces create a "nutcracker" effect, which increases pressure on the bars of the mouth as the reins are pulled. Choosing the right mouthpiece depends entirely on your horse's mouth conformation and what you want to achieve in your ride.
Pros and Cons of Using a Pelham Bit
The pelham bit offers several advantages. Its versatility enables riders to adjust control based on their horse’s needs, making it ideal for strong or forward horses. The ability to use one or two reins provides flexibility in training and competition. However, the pelham bit can be harsh if misapplied, especially by inexperienced riders. Its complexity requires skillful handling, and it may not suit green horses. Trainers and veterinarians agree that the pelham bit is best chosen for specific scenarios, such as transitioning to double bridles or managing horses that resist snaffles. Used thoughtfully, it can significantly improve communication and performance.
When and Why Should You Use a Pelham Bit?
Choosing the right bit can transform your riding experience. The pelham bit stands out for its unique versatility, making it a valuable choice in specific situations. Understanding when and why to use a pelham bit is essential for both horse and rider safety, comfort, and performance.
Is a Pelham Bit Right for Your Horse?
The pelham bit is most effective for horses with a strong disposition or those that need refined control. Riders with intermediate to advanced skills often choose this bit for hunter, jumper, and equitation classes, where both precision and subtlety are critical.
Disciplines such as polo, driving, and fox hunting also benefit from the pelham bit, thanks to its flexible rein setup. Many riders use it as a transitional tool when moving from a snaffle to a double bridle. In competitive events, the pelham bit appears frequently, especially in English show rings.
To explore more about usage and riding techniques, see the Understanding Pelham Bits resource.
Pelham Bit vs. Gag Bit
While both bits are designed to give you more control, they work in fundamentally different ways. The primary difference lies in the type of pressure they apply. A pelham bit uses leverage, combining snaffle and curb actions to apply pressure on the poll, chin, and mouth, which generally encourages the horse to lower its head and come into a frame. In contrast, a gag bit has cheekpieces that slide, creating a lifting action in the horse's mouth and on the poll. This design is often used for horses that tend to get heavy on the forehand or need encouragement to raise their heads. Many riders find that a pelham offers more refined control over a horse that respects jaw pressure, while a gag can be effective for specific training issues related to head carriage. Choosing the right bit is a key part of outfitting your horse, and you can explore a variety of options in our horse tack collection.
How a Pelham Can Help You and Your Horse
A pelham bit offers several advantages for both horse and rider:
- Improved communication through nuanced rein aids
- Enhanced control without sacrificing flexibility
- Ability to ride with one or two reins, tailoring the action to the horse’s needs
- Increased rider confidence, especially in challenging environments
Many riders report feeling safer and more in tune with their horses when using a pelham bit. Compared to alternatives like the Kimberwick or double bridle, the pelham bit provides a balanced blend of direct and leverage action, making it a popular choice in demanding situations.
As a Transitional Training Tool
For many riders, the pelham bit serves as an excellent stepping stone when preparing a horse for a double bridle. Moving directly from a simple snaffle to the complexity of a double bridle can be overwhelming for both horse and rider. The pelham introduces the concept of curb pressure and leverage in a more straightforward package. It allows the rider to practice using two reins and applying nuanced cues without managing two separate mouthpieces. This transitional phase helps the horse understand the new pressures gradually, building a foundation for the refined communication required in upper-level disciplines. It’s a smart way to find the right equipment that supports your training goals without rushing the process.
Use in Specific Sports like Polo
The pelham bit’s versatility makes it a popular choice in several fast-paced equestrian sports. In polo, for example, riders need immediate control to make quick stops and sharp turns, and the pelham’s leverage provides that extra authority when needed. Similarly, in disciplines like fox hunting and driving, the bit offers reliable communication and control, which is crucial for safety and performance. The flexible rein setup is a key advantage, as riders can adapt the bit’s action to the situation at hand. According to equestrian sources, its design allows for a blend of snaffle-like guidance and curb-like control, making it indispensable in sports that demand both speed and precision.
Before You Use a Pelham: Risks to Consider
While the pelham bit has clear benefits, it is not suitable for every horse or rider. Incorrect fitting or heavy-handed riding can cause discomfort, resistance, or behavioral issues such as head tossing and evasion.
This bit is generally not recommended for inexperienced riders or green horses, as its leverage can amplify mistakes. Veterinarians highlight risks to oral health and soft tissues if the pelham bit is used improperly. For example, a poorly adjusted curb chain or overly tight fit may lead to mouth sores or pinching, underscoring the importance of proper use.
Is Your Pelham Bit Competition Legal?
Competition rules regarding the pelham bit vary widely. In the United States, organizations like USEF allow pelham bits in certain hunter and equitation classes, but often restrict their use in dressage. Internationally, acceptance can differ, with some federations updating their guidelines as recently as 2026.
For junior and amateur riders, there are often stricter recommendations or outright restrictions on pelham bit usage. Always consult the latest official rulebooks and discipline-specific resources to ensure compliance before entering competitions.
Rules for English Disciplines
Pelham bits are a familiar sight in many English show rings, but their acceptance depends entirely on the discipline. You will commonly see them used in events where a bit more control or refinement is beneficial. For instance, pelhams are generally permitted in Hunter Under Saddle, Show Jumping, and Eventing, specifically in the cross-country and show jumping phases. In these sports, the pelham offers a way to manage a forward horse while maintaining a polished appearance. However, rules can be specific to the division or level you're competing in, so finding the right tack always starts with reading your organization's most current rulebook to ensure you're compliant before you enter the ring.
Prohibited Disciplines
Just as some disciplines welcome the pelham, others strictly forbid it. The most notable prohibition is in dressage, where pelham bits are illegal at every level. The philosophy of dressage emphasizes the horse's willing partnership and self-carriage, which is developed through training aids that don't rely on leverage. Similarly, you won't find pelhams in most equitation classes, as these focus on the rider's skill and effective use of basic aids. The bit is also not permitted in any Western riding discipline, which has its own distinct traditions and equipment. Always confirm your bit is legal before heading to a show to avoid any chance of disqualification.
A Note on Bit Converters
You might have seen a small leather strap connecting the two rings on a pelham bit. This is a bit converter, sometimes called a Pelham rounding. Its purpose is to allow a rider to use a single rein instead of two, which can simplify things for a beginner or in a fast-paced situation like cross-country. While they might seem convenient, it's crucial to know that using a bit converter is illegal in most horse show classes, particularly in hunter and equitation divisions. Using one in a class where it's not allowed is a quick way to get eliminated. If you're unsure, it's always safest to ride with two reins or choose a different bit.
Shop This Post

Featured in this article
AV Bob Avila Double Ring Snaffle Horse Bit - Sweet Iron Mouthpiece, 3" Rings - Multiple Sizes
$165.00
Shop Now →

How to Choose the Right Pelham Bit
Selecting the right pelham bit in 2026 requires a thoughtful approach. Riders must balance horse comfort, discipline requirements, and evolving bit technologies. The following criteria and trends will help you make an informed decision for both you and your horse.
What to Look for in a Pelham Bit
When choosing a pelham bit, start by evaluating your horse’s mouth conformation and sensitivity. Horses with low palates or fleshy tongues may need specific mouthpiece designs to avoid discomfort.
Your riding experience also plays a pivotal role. Less experienced riders should opt for milder mouthpieces and shorter shanks to ensure gentle communication. Discipline is key—certain pelham bit styles are favored in hunters, jumpers, or driving. Consider if stainless steel, rubber, or synthetic materials best suit your horse’s needs and your maintenance preferences.
Lastly, set a budget. Pelham bits range from economical to high-end custom models, so factor in durability and warranty when making your selection.
A Guide to Pelham Bit Styles
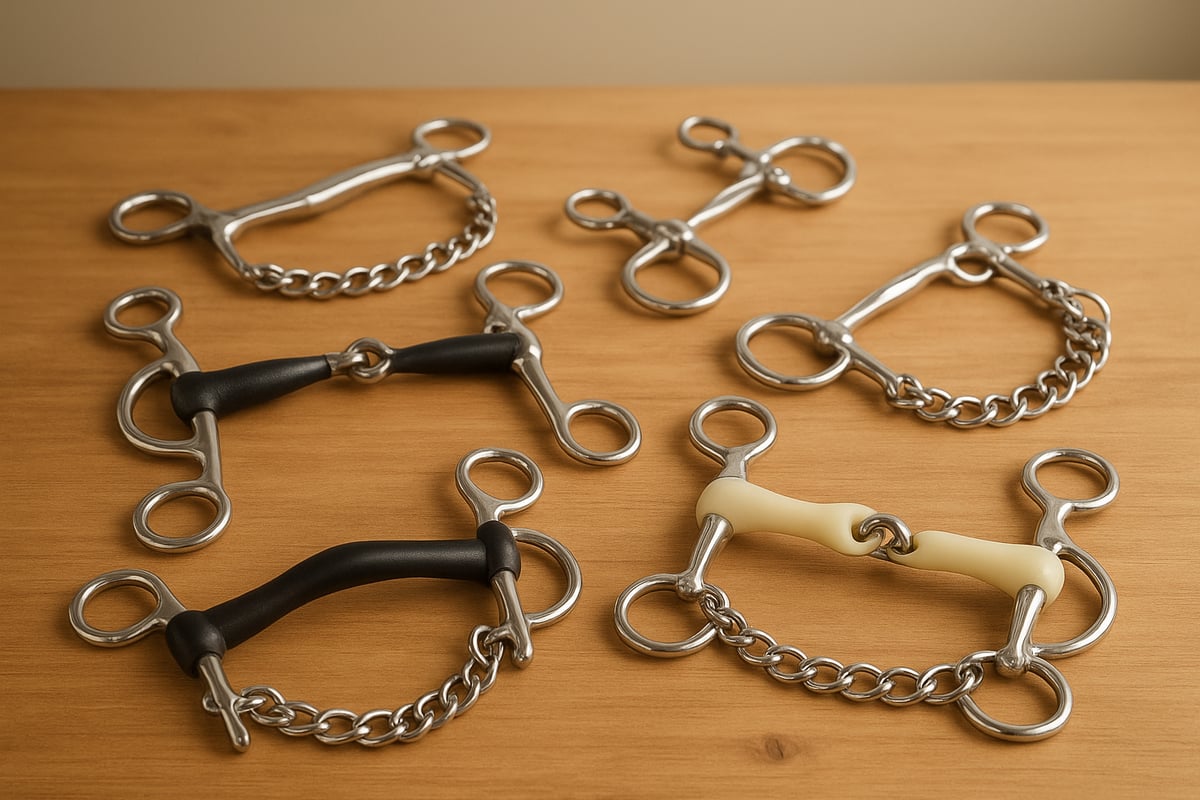
Pelham bits come in a variety of mouthpieces and shank styles, each offering distinct effects. Common mouthpieces include:
| Type | Features | Best For |
|---|---|---|
| Single-jointed | More tongue action | Responsive horses |
| Double-jointed | Softer, less nutcracker | Sensitive mouths |
| Mullen mouth | Even pressure | Green or steady horses |
| Ported | Tongue relief | Strong, mature horses |
Shanks may be short for less leverage or long for added control. Curb chains vary as well, from standard to padded or synthetic for extra comfort. Popular configurations adapt to show ring, polo, or fox hunting needs. Recent sales data shows a rise in double-jointed and ergonomic pelham bit models for 2026.
Common Pelham Variations
When you start looking at different pelham bits, you'll notice the main differences are in the mouthpiece and shank styles. Each variation creates a distinct effect, so it's important to match the bit to your horse's needs. Single-jointed mouthpieces apply more direct tongue pressure and are often best for responsive horses. Double-jointed versions are softer, reducing the "nutcracker" effect, which makes them a great choice for horses with sensitive mouths. For a green or steady horse, a mullen mouth provides even, consistent pressure across the tongue. If your horse is more mature and needs tongue relief, a ported mouthpiece can be an excellent option. You can find a wide variety of these styles when you shop for horse tack.
Historical Pelham Designs
The pelham bit has a fascinating history that explains its unique design. It first appeared in the 19th century as riders were looking for a simpler alternative to the double bridle. The goal was to create a single bit that could offer the direct rein action of a snaffle and the leverage of a curb bit. This hybrid design provided more control and refinement without the complexity of managing two separate bits and four reins. Its versatility made it popular for military and sporting purposes, and it has since evolved into a staple for many modern English disciplines. This historical context is key to understanding pelham bits and their function in today's equestrian world.
Getting the Size and Fit Just Right
Proper fit is critical for any pelham bit. Measure your horse’s mouth at the corners to select the correct width and avoid pinching. Shank length should match your intended discipline and your horse’s responsiveness.
A well-fitted pelham bit sits comfortably with one or two wrinkles at the mouth corners, and the curb chain should engage without causing discomfort. Adjustments are key for both performance and safety. For a detailed step-by-step guide on measurements and adjustments, see How to measure for a bit.
Check fit regularly, especially if your horse’s condition or dental health changes. Signs of poor fit include rubbing, head shaking, or resistance.
Modern Materials and Pelham Designs
In 2026, pelham bit designs have evolved with horse welfare in mind. New mouthpiece materials—such as hypoallergenic synthetics and flexible polymers—reduce oral irritation. Adjustable shanks and modular mouthpieces allow for customization as horses’ needs change.
Eco-friendly materials and manufacturing processes are becoming standard, reflecting the industry’s shift toward sustainability. Experts highlight ergonomic designs that enhance comfort while maintaining precise control. Market data indicates steady growth in demand for innovative pelham bit solutions among performance riders.
Exploring Different Bit Materials
The material of your pelham bit's mouthpiece directly influences how your horse accepts it. Stainless steel is a classic for a reason—it’s incredibly durable and easy to clean. However, some horses find it cold and uninviting. For more sensitive mouths, materials like rubber or modern flexible polymers offer a warmer, softer feel that can encourage salivation and reduce oral irritation. When making your choice, think about your horse's preference and your own maintenance routine. Newer hypoallergenic synthetics are also gaining popularity, prioritizing horse welfare above all. Exploring the different materials available in modern horse tack ensures you find the perfect match for comfort and clear communication.
Where to Buy Quality Pelham Bits
Purchasing a quality pelham bit starts with reputable tack shops or specialized equestrian retailers. Professional fitting services are invaluable, ensuring the bit is tailored to your horse’s anatomy.
Online shopping offers convenience and a broad selection, but always verify product authenticity and review return policies. In-store purchases allow hands-on assessment and expert advice.
When evaluating options, check for warranties and read customer reviews. This helps ensure you select a pelham bit that meets both your needs and your horse’s comfort for the long term.
How to Fit a Pelham Bit: A Step-by-Step Guide
Achieving a correct fit with your pelham bit is essential for both horse comfort and effective communication. Poor adjustment can cause pain, resistance, and even long-term oral issues. This step-by-step guide walks you through the entire fitting process, from preparation to final safety checks. Follow each section closely to ensure your pelham bit supports your horse’s well-being and your riding goals.
What You'll Need Before You Start
Before placing a pelham bit on your horse, take time to prepare properly. Gather essential tools, such as a soft measuring tape, clean towel, and bit wipes. Inspect the bit for rough edges or wear. Ensure the bit is thoroughly cleaned to prevent residue from irritating your horse’s mouth.
Assess your horse’s mouth and head structure. Look for any existing dental issues, scars, or signs of sensitivity. Keep a checklist handy, including mouthpiece width, shank length, and curb chain type. Common pre-fitting mistakes include skipping bit inspection or ignoring subtle signs of discomfort.
Preparation sets the foundation for a successful pelham bit fitting and a positive experience for your horse.
Step 1: Measure for the Right Mouthpiece
Begin by measuring your horse’s mouth accurately. Use a flexible tape to determine the distance between the lips, ensuring the pelham bit will not pinch or hang too loosely. Select a mouthpiece thickness that matches your horse’s oral conformation—thicker mouthpieces are often milder but may not suit horses with low palates or small mouths.
Consider your horse’s dental health, existing sensitivities, and training level when choosing the mouthpiece style. For example, a mullen mouth or double-jointed bit may offer extra comfort for sensitive horses. Data shows that incorrect sizing is a leading cause of resistance and poor performance with the pelham bit.
A well-chosen mouthpiece promotes acceptance and effective communication.
Step 2: Adjust the Curb Chain Correctly
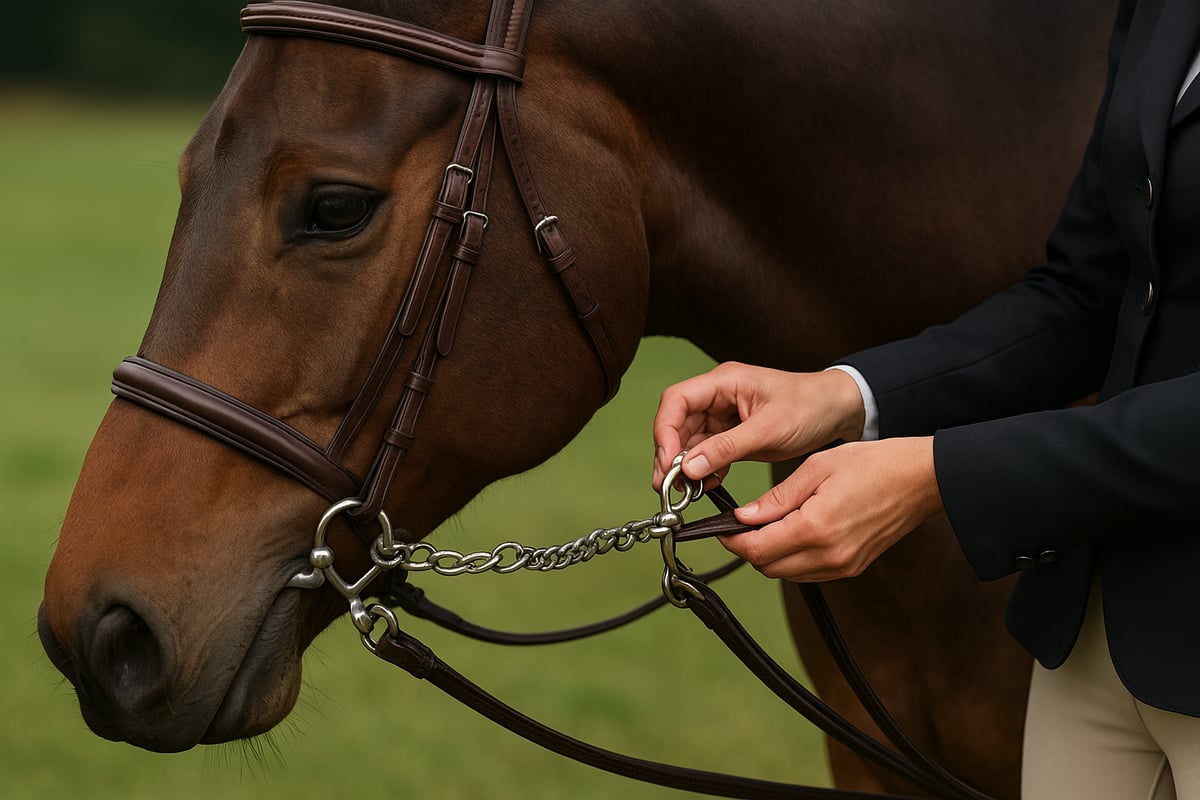
Proper curb chain adjustment is crucial for the pelham bit’s effectiveness and your horse’s comfort. The chain should rest flat against the chin groove, not twisted. Apply the “two-finger rule,” ensuring you can fit two fingers snugly between the chain and chin when the shanks are pulled back.
Too tight a chain causes excessive pressure, while too loose reduces the bit’s function. For sensitive horses, curb chain guards or padded chains can help. For further detail on correct adjustment and rein attachment, refer to the Pelham Bit Fitting Guidelines.
Careful curb chain adjustment prevents discomfort and encourages willing responses from your horse.
Beyond the Two-Finger Rule
While the two-finger rule is a solid starting point, a truly correct fit depends on your horse’s individual anatomy and sensitivity. The goal is for the curb chain to engage smoothly when you use the curb rein, applying even pressure to the chin groove. If the chain is too tight, it can cause immediate discomfort, pinching, or even mouth sores over time. If it’s too loose, the leverage action of the pelham is lost, and the shanks will rotate too far back before making contact, leading to unclear signals and a delayed response from your horse.
Pay close attention to your horse’s reaction. Signs like head tossing or resistance might indicate the pressure is still too sharp, even if the chain seems to fit correctly. For more sensitive horses, consider using a leather or gel curb chain guard to soften the action. You can find a variety of comfortable and effective options in a quality horse tack collection. Ultimately, the perfect adjustment allows for clear communication without causing your horse any distress, ensuring the bit works with them, not against them.
Step 3: Position the Bit in Your Horse's Mouth
Attach the cheekpieces so the pelham bit sits evenly, with the mouthpiece resting at the correct height. Look for one or two small wrinkles at the corners of the mouth, signaling proper placement. Avoid positioning the bit too high, which causes pinching, or too low, which leads to instability.
Check that the mouthpiece lies flat and does not contact the horse’s teeth or palate. Ensure the shanks are aligned, and the curb chain sits smoothly in the chin groove. Visual cues, such as even lip tension and a relaxed jaw, indicate a comfortable fit.
Correct positioning is vital for clear aids and a happy, responsive horse.
Correct Height and Placement
Getting the height and placement of your pelham bit just right is key to your horse's comfort and your communication. A properly fitted pelham should create one or two small, soft wrinkles at the corners of your horse's mouth. This is the classic sign that the bit is sitting correctly, allowing you to give clear signals without causing any discomfort. When you attach the cheekpieces, make sure the bit sits level. The mouthpiece needs to be at the right height—if it's too high, it can pinch, but if it's too low, it might bump against the teeth or feel unstable. Double-check that the mouthpiece lies flat against the tongue and that the shanks are straight. The curb chain should also rest smoothly in the chin groove. A relaxed jaw and even tension on the lips are great signs that you've found the sweet spot for a comfortable fit. For more in-depth fitting tips, you can find some great guidelines on pelham bits that cover everything from curb chains to rein setup.
Step 4: Attach Reins and Make Final Checks
Attach both snaffle and curb reins to the pelham bit, or use roundings if preferred. Balance rein length and tension, making sure each rein moves freely without tangling. Test responsiveness by gently engaging the reins, watching for signs of relaxation or tension in the horse.
Perform a final safety check: inspect all buckles and attachments, confirm even pressure, and ensure nothing pinches or rubs. Common issues include uneven rein tension or improperly fastened curb chains. Address problems before mounting to protect both horse and rider.
Proper rein setup and final adjustments guarantee your pelham bit works as intended, supporting safe and effective riding.
How to Ride Effectively with a Pelham Bit
Effectively riding with a pelham bit requires mastering rein technique, thoughtful training, and a focus on the horse’s comfort and welfare. This section breaks down professional strategies and solutions, ensuring you and your horse benefit from this versatile bit.
A Guide to Using Double Reins
Riding with a pelham bit involves using two sets of reins, which can be challenging for many riders. The snaffle rein provides direct pressure, while the curb rein applies leverage. Properly managing both reins is essential for precise communication.
Hold the snaffle rein as you would with a regular snaffle, while the curb rein sits below your little finger. Practice independent finger movement to adjust each rein without tension. To better understand the differences in rein action, refer to this helpful Snaffle vs. curb bits guide.
Common mistakes include uneven tension or relying too heavily on the curb rein. Practice switching between aids and focus on softness, ensuring your signals are clear and comfortable for your horse.
Schooling Exercises with a Pelham
Introducing the pelham bit should be a gradual process. Begin in a quiet environment, allowing the horse to get accustomed to the new feel. Start with light contact on the snaffle rein, only engaging the curb when necessary.
Transition from a snaffle by alternating rides, building trust and responsiveness. Use groundwork and simple flatwork exercises to reinforce cues. Consistency in schooling helps the horse associate the pelham bit with positive, clear communication.
If resistance or confusion occurs, return to basics and ensure proper fit. Patient, progressive training ensures the pelham bit becomes a valuable tool rather than a source of discomfort.
Common Riding Challenges and How to Fix Them
The pelham bit is popular in jumping, hacking, and show situations where extra control is needed. In fast-paced environments, use the snaffle rein for regular work and the curb rein for added stopping power or collection.
For horses that pull or lean, adjust your rein tension and encourage balance through transitions. Sensitive horses may require lighter contact and more frequent checks for fit and comfort.
If resistance such as head tossing arises, reassess your technique. Adapting your approach to each scenario ensures the pelham bit remains an asset, not a hindrance, in your riding toolkit.
Troubleshooting Common Pelham Bit Issues
Signs of discomfort with a pelham bit include excessive chewing, head shaking, or evasion. Address these issues by checking the fit, adjusting the curb chain, and refining your rein aids.
If problems persist, seek guidance from a qualified trainer or bit specialist. Sometimes, switching mouthpiece styles or using roundings can improve results.
Common user errors include overusing the curb rein or having an ill-fitted bit. Regularly reassess your horse’s response to the pelham bit, and do not hesitate to make changes for improved welfare and performance.
Putting Your Horse's Comfort First
Rider safety and horse welfare are paramount when using a pelham bit. Always use gentle hands and avoid abrupt movements. Monitor your horse for mouth injuries, irritation, or behavioral changes.
Periodically review the fit and condition of the bit, making adjustments as your horse’s needs evolve. Balance training aids with humane practices, prioritizing clear, consistent communication.
Consult with veterinarians and professional trainers for guidance on best practices. By combining expertise with empathy, you ensure the pelham bit supports both performance and the long-term well-being of your horse.
How to Care for Your Pelham Bit
Proper care and maintenance of your pelham bit are essential for both your horse’s comfort and the equipment’s lifespan. Regular attention can prevent common issues, extend usability, and ensure optimal performance in the saddle.
The Right Way to Clean and Store Your Bit
A consistent cleaning routine keeps your pelham bit safe and comfortable for your horse. Rinse the bit after every ride to remove saliva and debris. Use warm water and a soft brush to gently scrub away residue, paying special attention to joints and the curb chain.
For deeper cleaning, soak the pelham bit in a mild disinfectant weekly. Avoid harsh chemicals that may corrode the metal or irritate your horse’s mouth. Store the pelham bit in a dry, well-ventilated area to prevent rust and damage.
When cleaning, make sure to inspect the curb chain for buildup or wear. For more detailed guidance on curb chain care and adjustment, see Understanding the curb chain.
How to Check Your Bit for Wear and Tear
Routine inspection of your pelham bit is crucial for safety and longevity. Look for signs of metal fatigue, such as cracks, sharp edges, or excessive wear on the mouthpiece and shanks. Check the curb chain and rein attachments for loose links or broken parts.
Create a regular inspection schedule, especially if your pelham bit sees heavy use. Replace the bit immediately if you notice any structural issues to prevent injury to your horse. Most stainless steel pelham bits last several years with proper care, while softer materials may require more frequent replacement.
If you are unsure what to look for, consult a professional or refer to official equipment guides for accepted standards and maintenance advice.
Regular Checks for Your Horse's Comfort
Maintaining your pelham bit involves monitoring your horse’s comfort over time. Watch for changes in your horse’s mouth, such as sores or altered chewing habits, which can indicate the need for adjustment or replacement.
As your horse ages, its mouth conformation may change. Reassess the fit of your pelham bit regularly, especially after dental work or health changes. Consult with an equine dental professional to ensure the bit remains suitable.
Upgrading or modifying your pelham bit may be necessary as your horse’s needs evolve. A well-fitted, well-maintained pelham bit contributes to long-term performance and comfort.
Safe Handling and Storage Practices
Modern pelham bit care also means considering environmental and safety factors. Use eco-friendly cleaning products that are safe for both your horse and the environment. Dispose of old or damaged bits responsibly by recycling where possible.
Store your pelham bit out of reach of children and animals to avoid accidents. Follow barn safety protocols and keep your equipment organized. By adopting sustainable practices and prioritizing safety, you contribute to a healthier barn environment and prolong the life of your pelham bit.
Frequently Asked Questions About Pelham Bits
Whether you are new to the pelham bit or seeking a finer understanding, these commonly asked questions shed light on practical use, misconceptions, and expert strategies. Riders at every level can benefit from clear, evidence-based answers to ensure both horse comfort and rider confidence.
Answering Your Top Pelham Bit Questions
Many riders wonder if the pelham bit is suitable for every horse. In reality, not all horses respond well to this type of bit. Horses with sensitive mouths or inexperienced riders may find it overwhelming. The pelham bit is often compared to other leverage bits, but its unique design offers both direct and leverage action.
Can beginners use a pelham bit safely? With proper instruction and supervision, it is possible, but it is generally better suited to intermediate or advanced riders. Fitting mistakes are common, such as incorrect curb chain tension or improper mouthpiece size. For a detailed overview of acceptable bit types and fitting tips, consult the Bit Rules & Equipment Guide.
Pelham Bit Myths vs. Facts
A persistent myth is that the pelham bit is always harsh. In fact, severity depends on the rider’s hands, correct fitting, and the horse’s individual response. Another misconception is that only advanced riders should use pelham bits. While experience helps, proper training and gradual introduction make the pelham bit accessible to a wider range of riders.
The curb chain is often misunderstood. Its purpose is to balance leverage, not to cause pain. Veterinarians and trainers agree that, when fitted and used correctly, the pelham bit can be a humane and effective tool. Recent rider surveys show that perceptions are shifting, with more equestrians recognizing its versatility.
Pro Tips for Experienced Riders
For those with experience, fine-tuning rein aids is essential to maximize the pelham bit’s subtle communication. Customizing mouthpieces, such as opting for a French link or mullen mouth, allows adaptation to specific horse needs. Integrating the pelham bit into advanced training programs can refine transitions, collection, and responsiveness.
When preparing for high-level competition, practice using both reins independently. This enhances control in technical movements. Top riders in 2026 emphasize the importance of regular bit checks and keeping communication soft and consistent for optimal performance.
Where to Learn More
Expand your knowledge of the pelham bit with reputable books, articles, and instructional videos. Professional bit fitting services can provide personalized advice for you and your horse. Online forums and communities offer peer support and troubleshooting tips.
For the latest competition regulations and recommendations, review the FEIF Equipment Guidelines 2023. Additionally, official rulebooks and manufacturer websites are valuable resources for staying updated on best practices and product innovations.
Whether you’re exploring the finer points of Pelham bit anatomy or seeking expert guidance on fitting and riding techniques, it’s clear that having the right equipment is essential for your horse’s comfort and your own confidence in the saddle. At Hooves and Paws, you’ll find a wide selection of quality Pelham bits and equestrian gear designed to meet the latest standards in 2026. With free US shipping and flexible payment options, you can shop with peace of mind and focus on what matters most—your partnership with your horse. Ready to upgrade your tack? Buy Now
Key Takeaways
- Understand Its Two-Rein System: A Pelham combines two functions in one bit. Use the top (snaffle) rein for direct communication and the bottom (curb) rein to apply leverage for more refinement or control, allowing you to adapt your aids to the situation.
- Prioritize a Correct Fit: The bit's effectiveness and your horse's comfort hinge on proper adjustment. Aim for one to two soft wrinkles at the corners of the mouth and ensure the curb chain lies flat with enough space for two fingers to prevent discomfort and ensure clear signals.
- Choose It for the Right Job: The Pelham is a specific tool best suited for horses that need more control or as a step toward a double bridle. It's a great choice for disciplines like jumping or polo but is not intended for green horses, novice riders, or sports like dressage where leverage bits are prohibited.


